Description
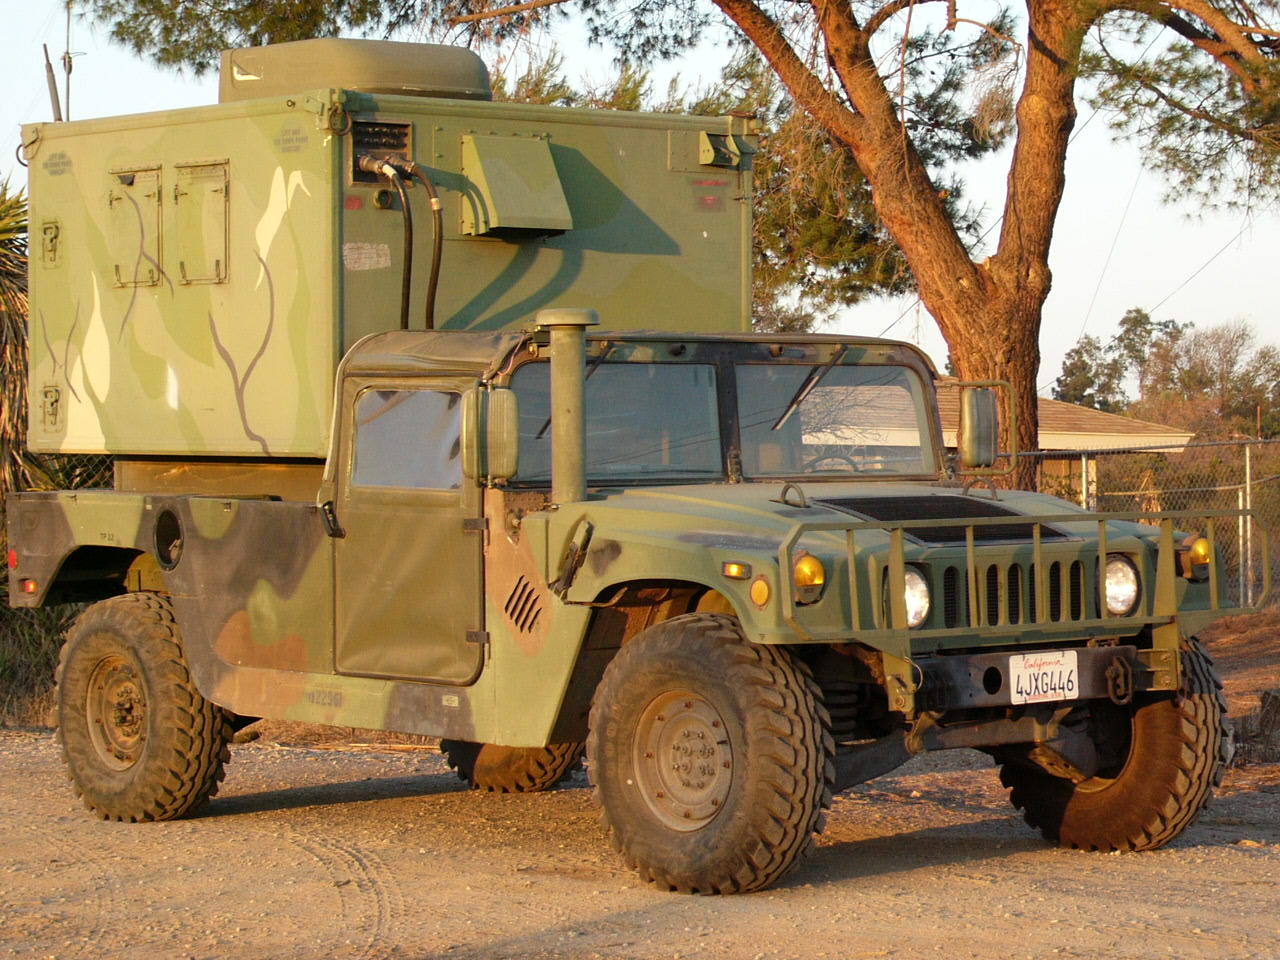
This truck is an M998 High-Mobility Multipurpose Wheeled Vehicle, commonly called a HMMWV (pronounced “humvee”). This 1-1/4 ton truck replaced several different 3/4 to 1-1/4 ton trucks in use at the time of its introduction. There are many variations of this truck, including lightly-armored weapon carriers with machine guns, grenade launchers or TOW missile launchers, ambulances, communication shelter carriers, etc. There have also been other custom configurations based on the HMMWV chassis, such as the Avenger missile system. There are civilian versions of the HMMWV, called “Hummers”. My truck was used by the US Marine Corps before I bought it.
The HMMWV has been a fairly controversial truck. Every opinion I have heard about them has been either strongly positive or strongly negative. It has been criticized for being too heavy, too wide, to unreliable and to complicated. It has also been praised for being extremely maneuverable, very easy to drive, being very capable on extremely rough terrain, and being very reliable (go figure!).
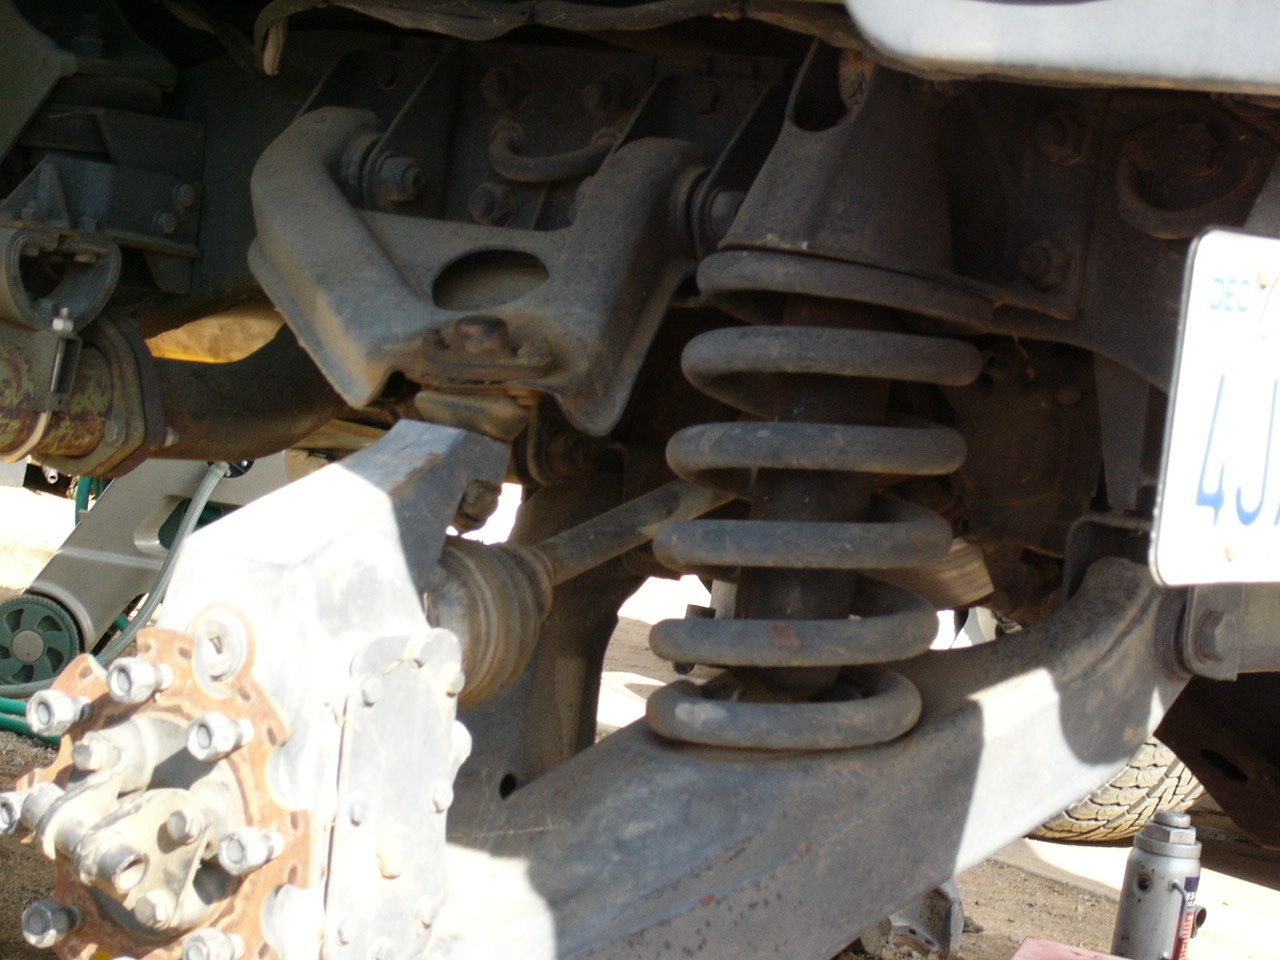
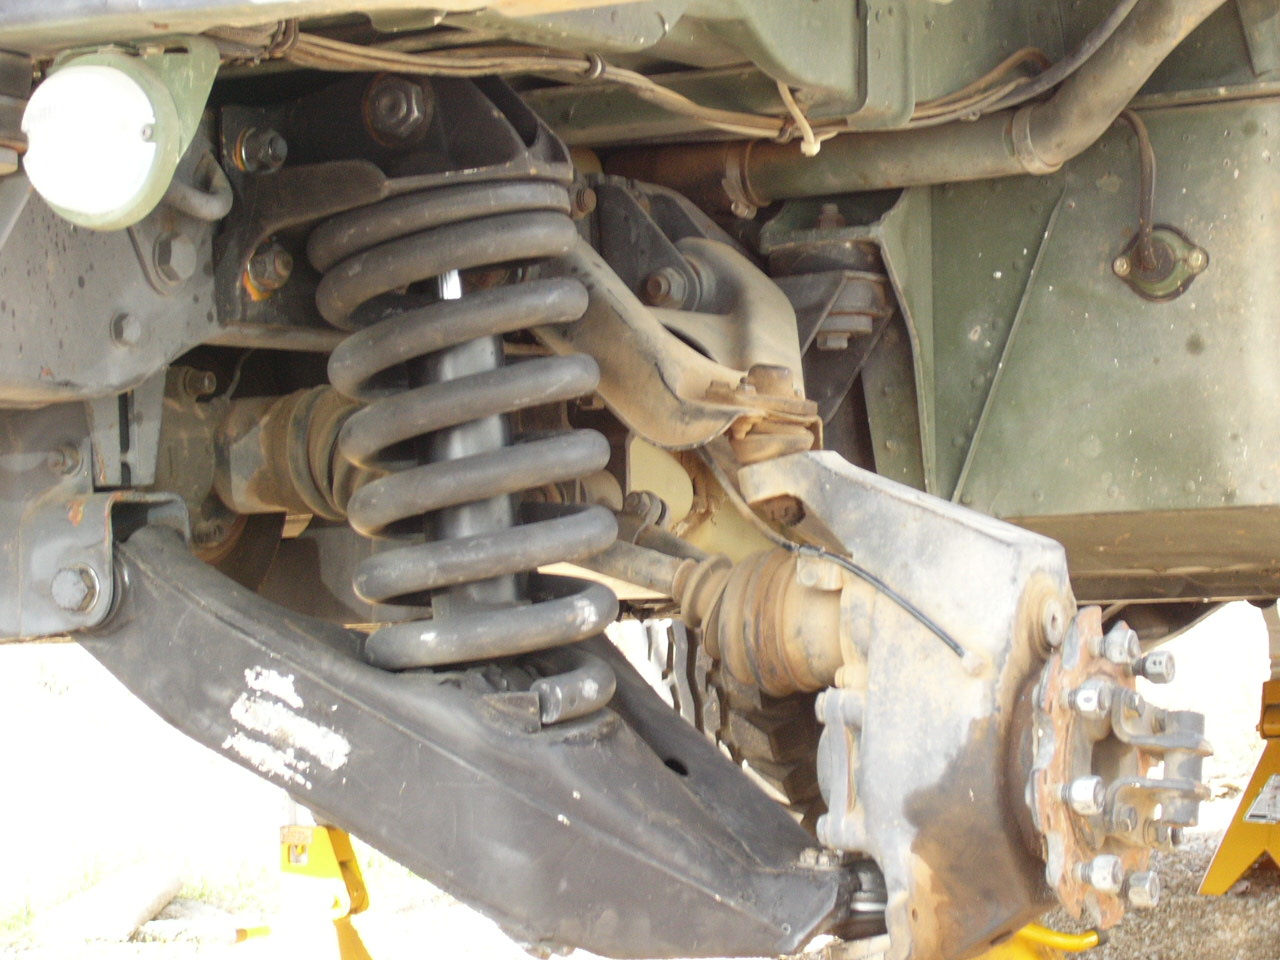
At 7’1″ wide, the HMMWV is much wider than the M151 Mutt which it replaced (among other trucks). It has a very high ground clearance of 16″ under the axles, and its width helps compensate for its high center of gravity. The entire driveline is mounted very high in the body of the truck; in fact, the truck is somewhat cramped inside despite its width, because part of the engine lives between the front seats! It has 4-wheel independent suspension and full-time 4-wheel drive. Ground clearance is improved by geared hubs in each wheel, which allows the axles to enter the hubs above the centerlines of the wheels. The differentials are mounted even higher, creating the appearance of a cavernous tunnel underneath the truck. The 4-wheel disc brakes are mounted inboard at the differentials. The truck has a characteristic “sloshy” feeling when stopping because each brake are separated from its wheel by a gearbox and a driveshaft.
Although it’s a wide and heavy vehicle, the HMMWV is very easy to drive. It’s curb-to-curb turning diameter is about 11′ narrower than my 1992 Toyota 4Runner’s, allowing it to maneuver around obstacles much more easily than you would expect from a truck of its size. It has an automatic transmission and power steering. The power steering applies a lot of steering boost, allowing the driver to make tight stop-to-stop turns with a finger or two, even though the truck’s steering wheel is quite small. The sloshy feeling of the brakes takes a bit of time to get used to, but the truck is still a joy to drive right from the start.
Specifications
General Specifications
| Name | M998 HMMWV |
|---|---|
| Manufacturer | AM General |
| Manufactured | June 17, 1986 |
| Cargo capacity | 2,500 lbs |
| Towed load | 3,450 lbs |
| Height | 69 in (5 ft 9 in, reducible to 55 in) |
| Length | 180 in (15 ft) |
| Width | 85 in (7 ft 1 in) |
| Gross vehicle weight | Tare: 5,200 lbs Gross: 7,700 lbs |
| Pintle height | approx. 28″ |
| Ground clearance | Under axle: 16 in Under chassis: 24 in |
| Vehicle/bridge classification | Empty: 3 Loaded: 4 |
| Wheel base | 130 in (10 ft 10 in) |
| Approach angle | 72° (47° with winch) |
| Departure angle | 45° |
| Turning radius | 292 in (24 ft 4 in) |
| Cruising range | 300 mi |
| Fording depth | 30 in |
| Tires | 36×12.5-16.5 LT |
| Tire inflation | Front: 20 psi Rear: 22 psi |
Engine
| Engine | Model DDA 6.2 L 6.2 liter V8 diesel, liquid-cooled, naturally aspirated |
|---|---|
| Power | 150 HP at 3,600 RPM |
| Torque | 260 pound-feet at 2000 RPM |
| Displacement | 379 cu. in. (6.2 liters) |
| Engine weight (dry) | 650 lbs |
| Idle speed | 625-675 RPM |
| Operating speed | 1500-2300 RPM |
| Oil pressure at idle (min) | 15 psi |
| Oil pressure at normal operation | 40-50 psi |
| Coolant temperature | 190°F to 230°F |
| Fuel consumption | 13.5 mpg |
Fill Capacities
| Cooling system | 26 quarts |
|---|---|
| Differential | 2 qts (each of 2 diffs) |
| Engine oil (crankcase only) | 7 quarts |
| Engine oil (crankcase and filter) | 8 quarts |
| Geared hub | 1 pt (each of 4 hubs) |
| Fuel | 25 gallons |
Pictures
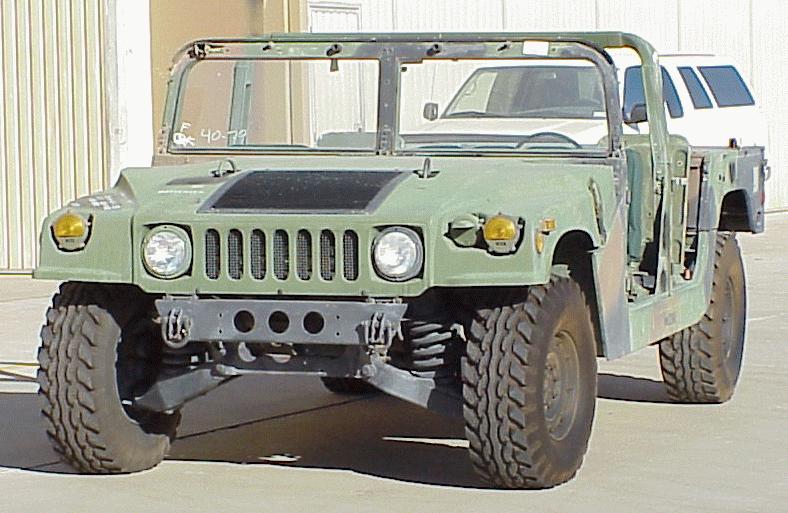 Front view of truck. 12/25/99 |
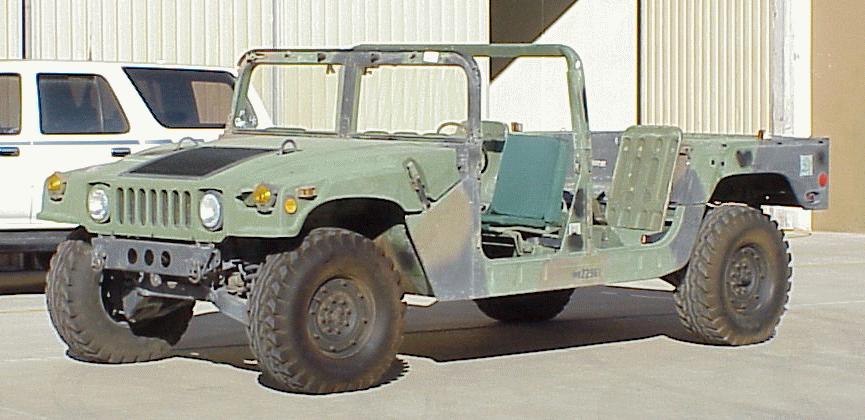 Left view of truck. 12/25/99 |
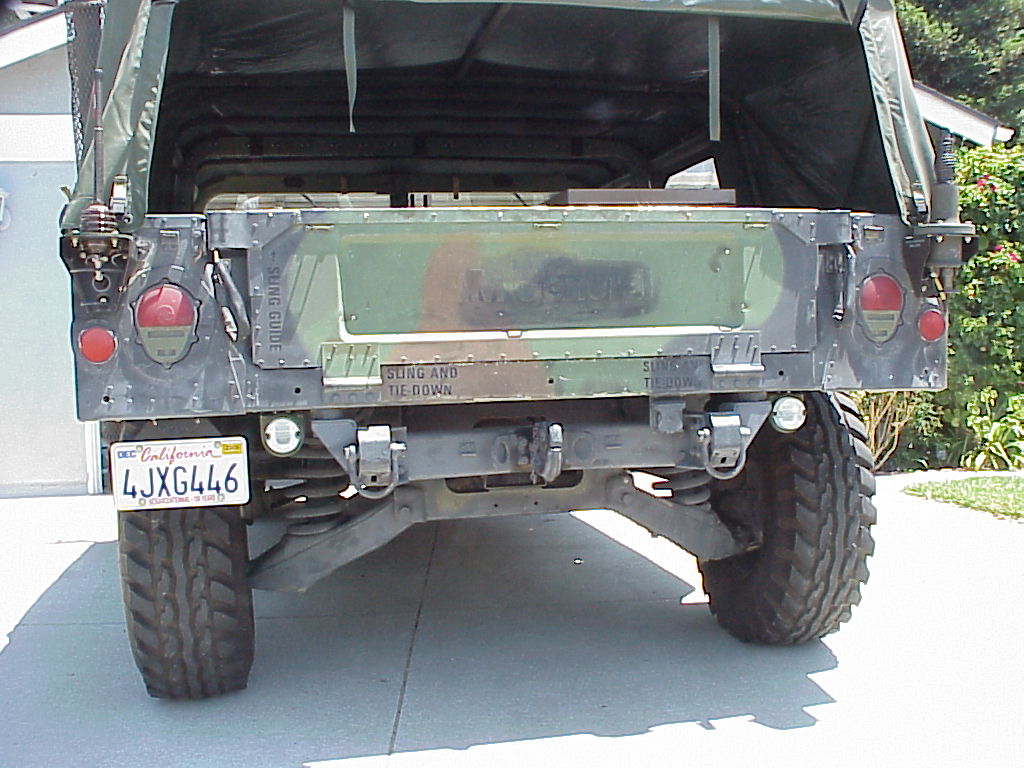
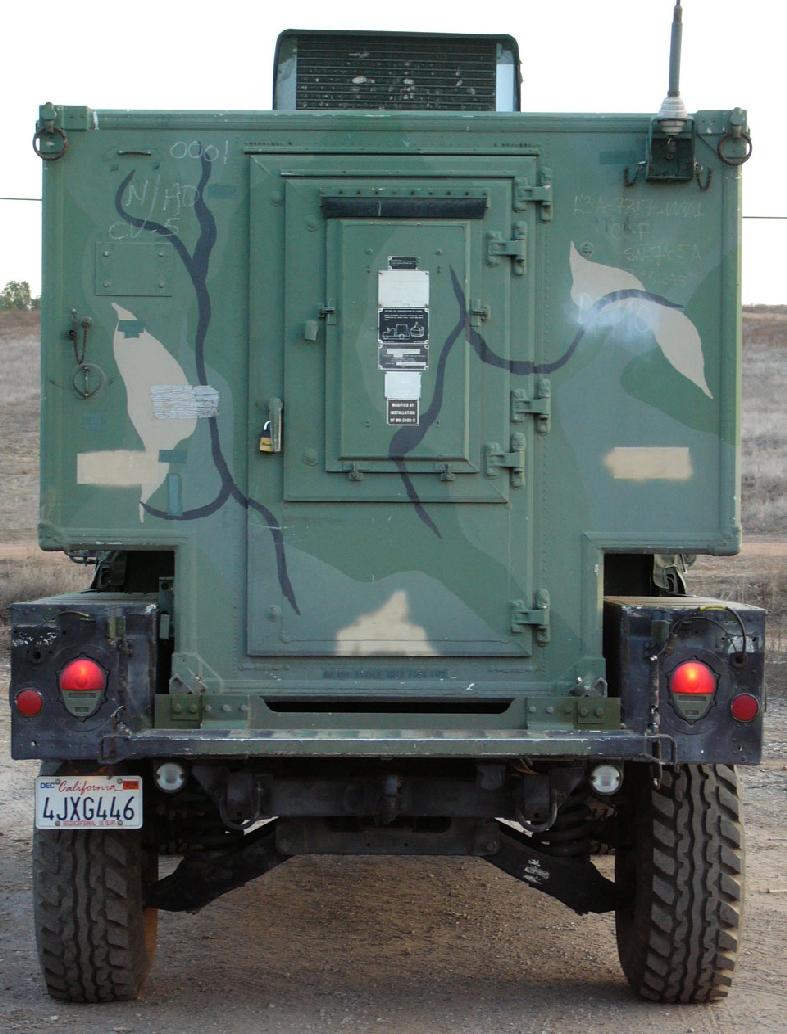
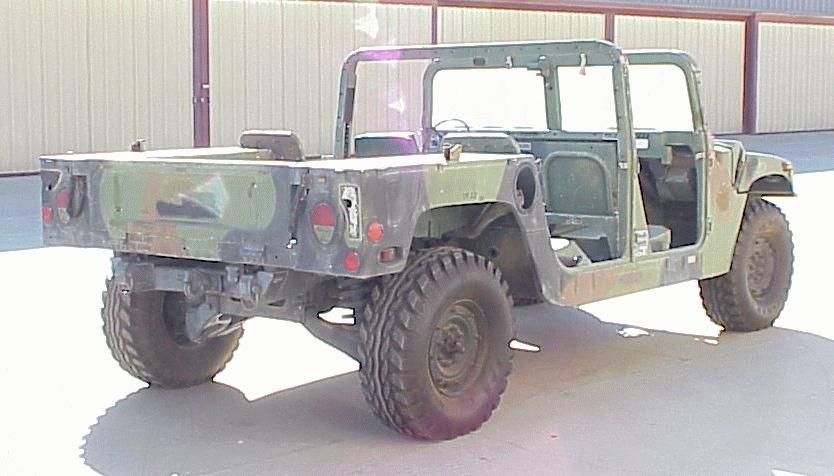 Right rear view of truck. 12/25/99 |
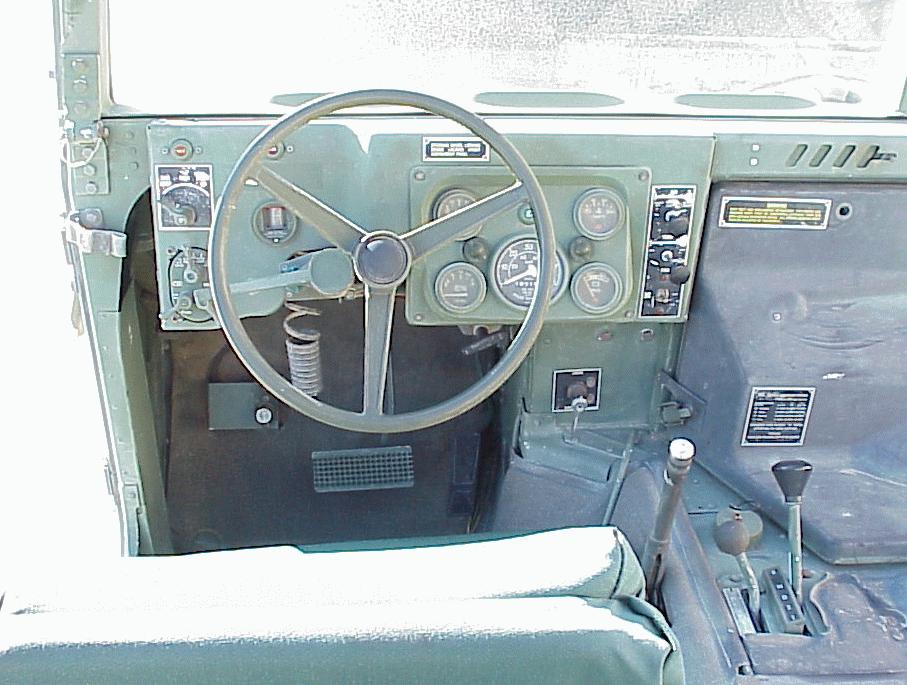 Dashboard, driver’s side. 12/25/99 |
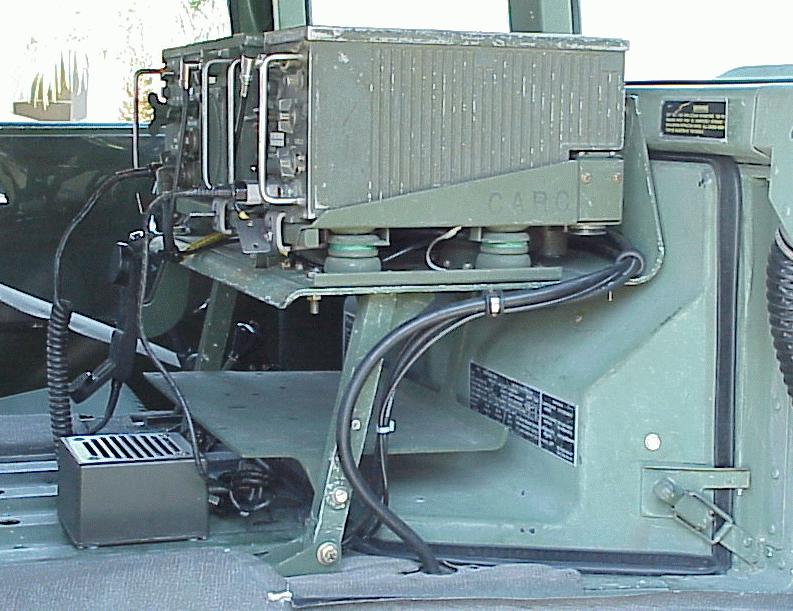
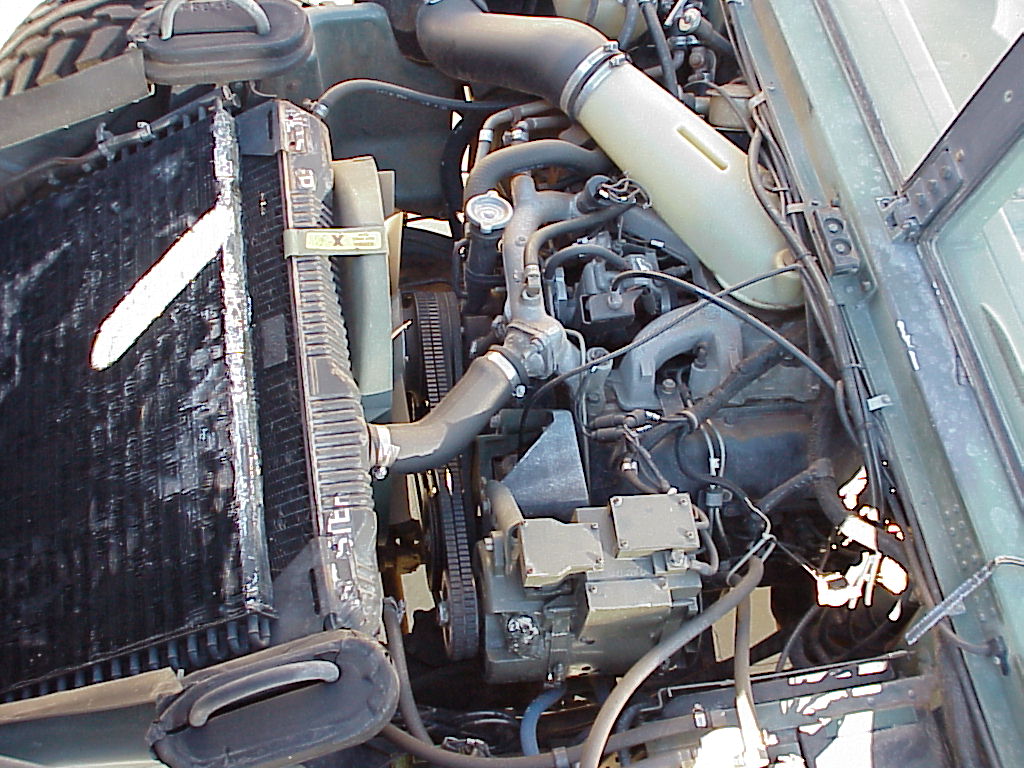 Engine, with 100A alternator. Front of truck is towards the left. 12/25/99 |
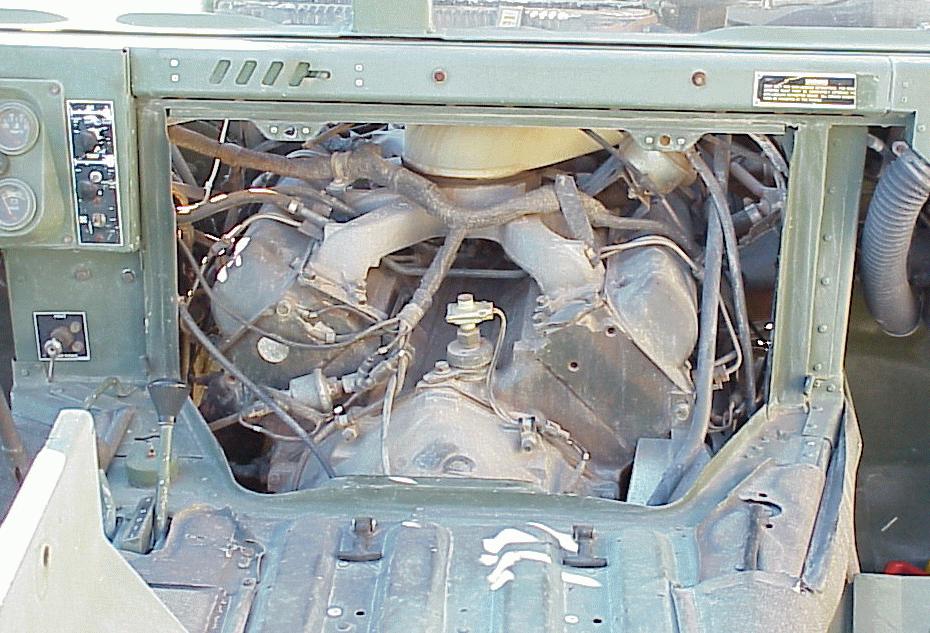 Rear of engine, through access cover in passenger compartment. 12/25/99 |
 Brandon, the guy who rents me hangar space for my 2.5-ton shop van, liked my HMMWV so much that he bought one, too! Like mine, his truck has some problems to be fixed, but I don’t think he’ll have any more trouble than I had. We think that his glow plug controller is dead, and his fan is stuck on, but his fuel injection pump doesn’t seem to have the problems that mine did. 2/3/00 |
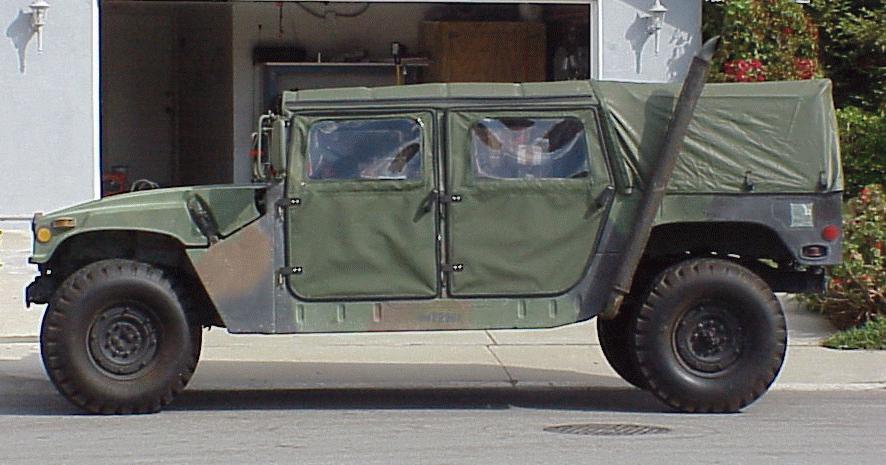 Left side view, with 4-door soft top, cargo area cover and deep-water fording exhaust stack installed. I have not found a fording intake snorkel yet. 2/5/00 |
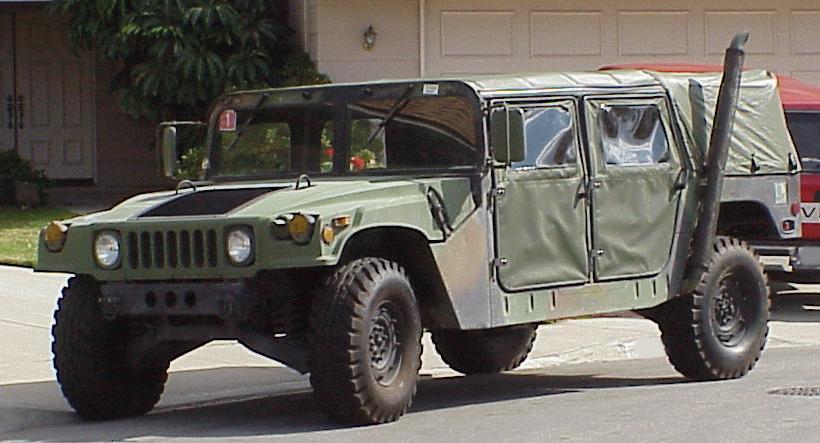 Left front view, with 4-door soft top and cargo area cover. 2/5/00 |
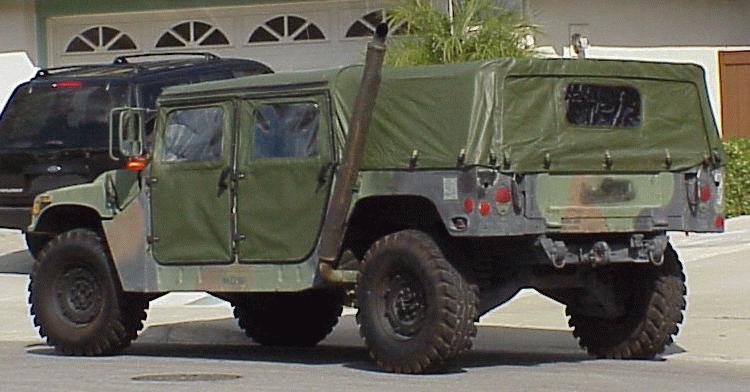 Left rear view, with 4-door soft top and cargo area cover. 2/5/00 |
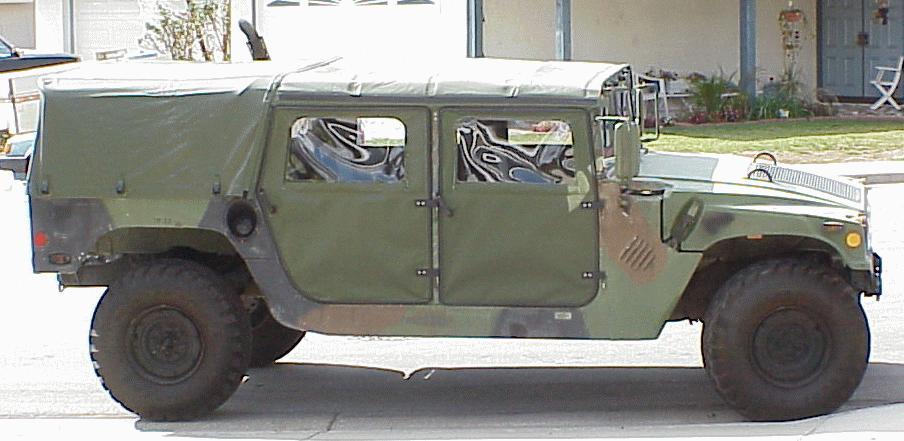 Right side view, with 4-door soft top and cargo area cover. If I had the engine air intake snorkel, the intake mushroom cap, visible in front of the right side mirror, would be raised to about the top of the windshield. 2/5/00 |
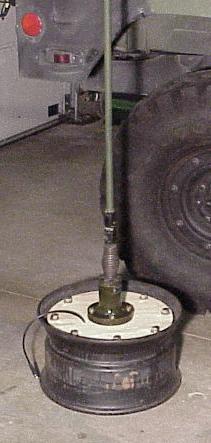 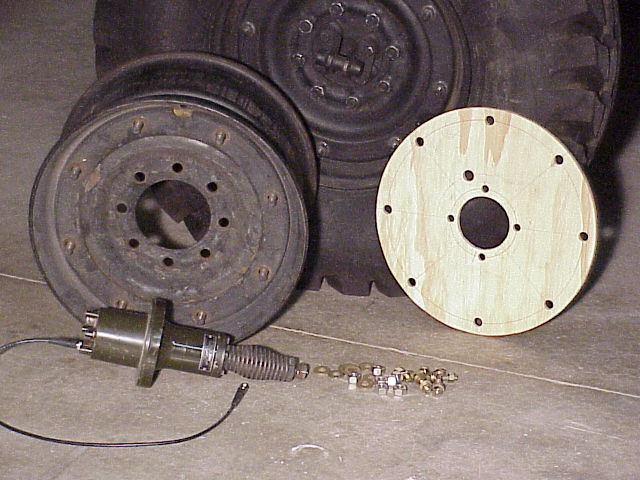 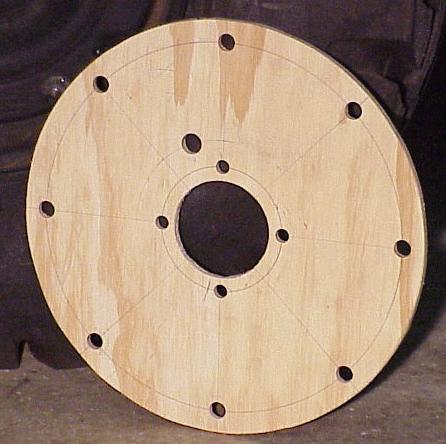 A worn-out HMMWV wheel gets a new life as a portable antenna base for an AS-1729 antenna. Later, I painted the plywood part flat black. 4/17/00 |
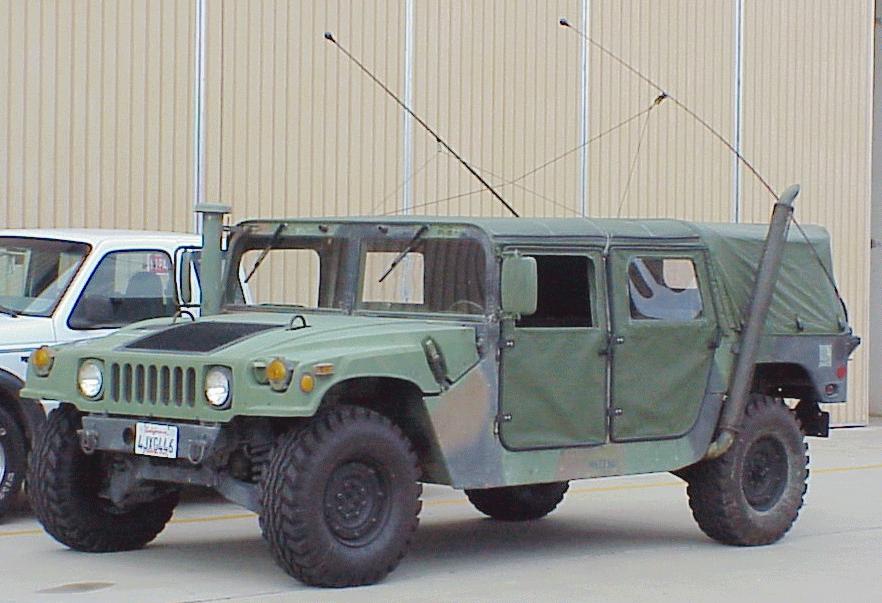 Left front view, with antennas and intake snorkel installed. 4/22/00 |
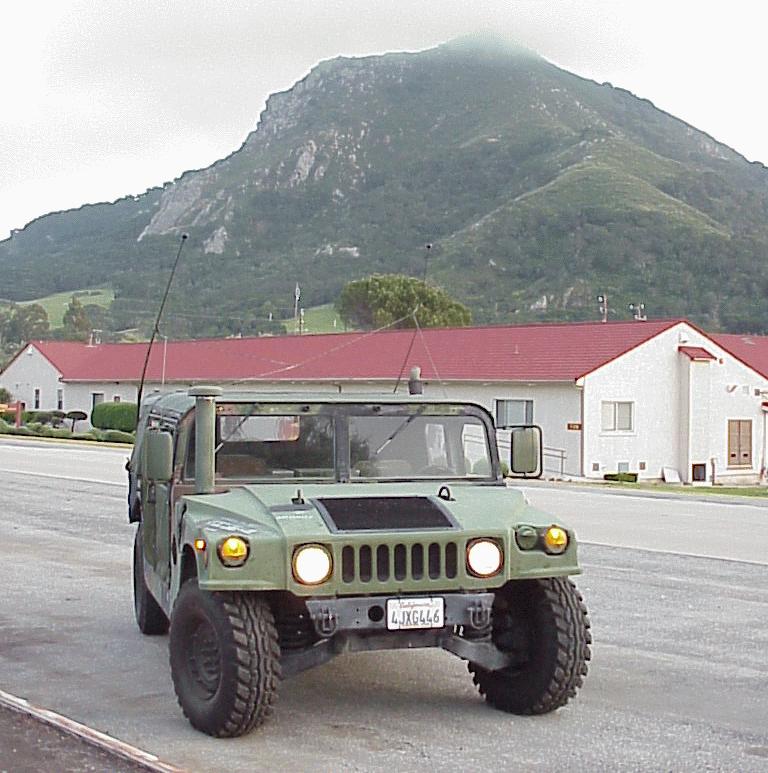 My truck poses for a picture at Camp San Luis Obispo, at the 2000 Military Radio Collector’s Group meeting… right before going to the truck hospital for head gasket surgery.  5/5/00 |
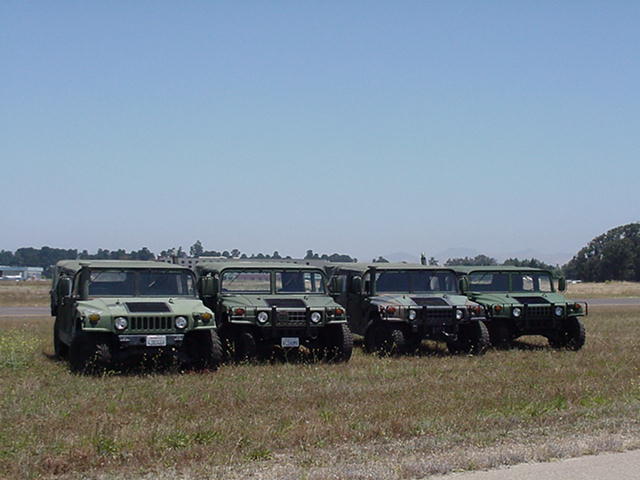 My truck’s friends at the Santa Maria airport throw it a party after it comes out of the truck hospital with its new cylinder heads and gaskets! I couldn’t be there for the party, unfortunately, but I’ll pick it up next week. My truck is on the left. Photo courtesy of Damon, who belongs to the third truck from the left, if I’m not mistaken. 6/25/00 |
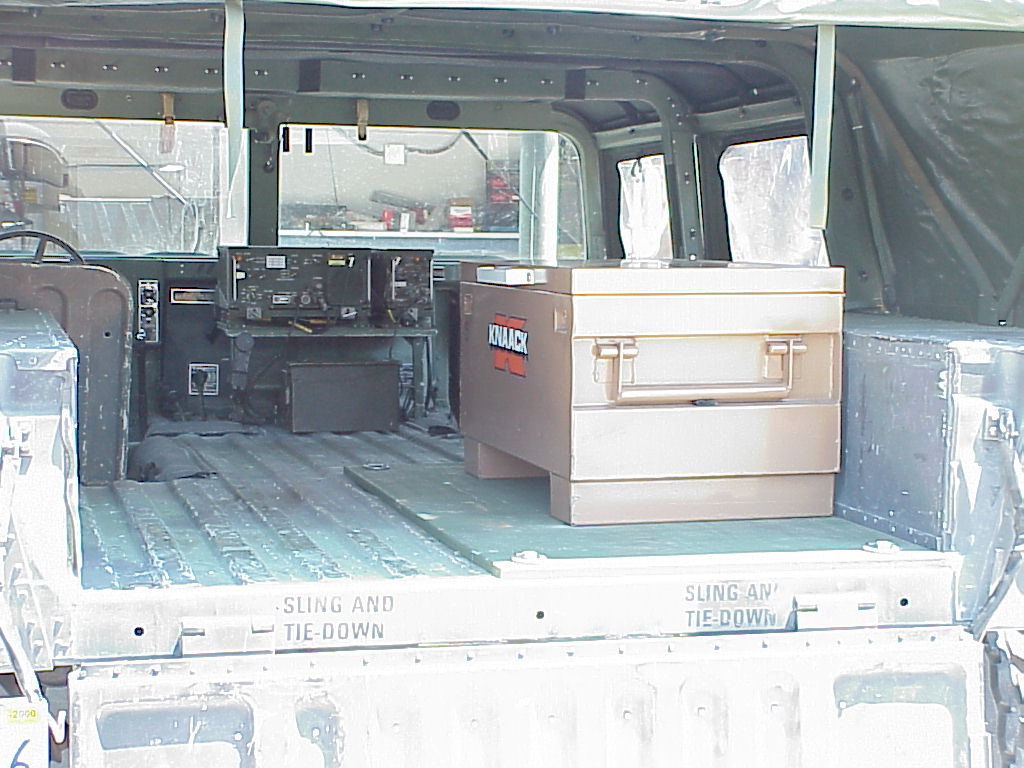
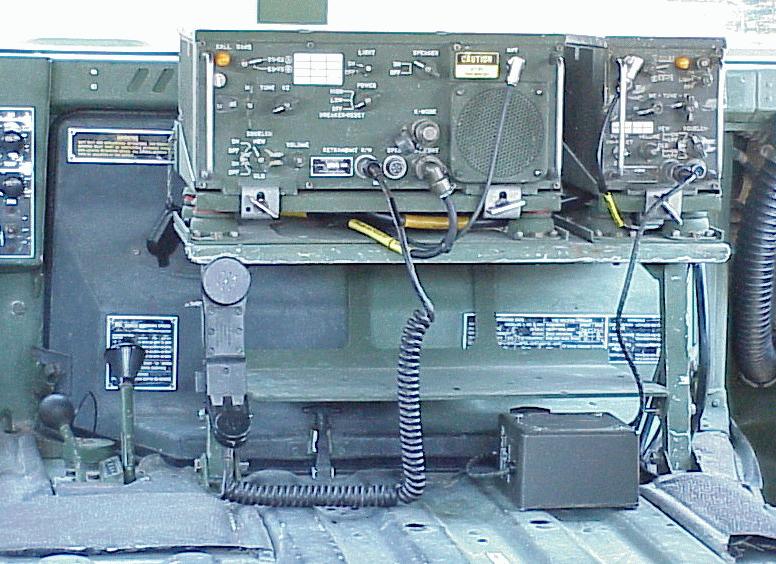  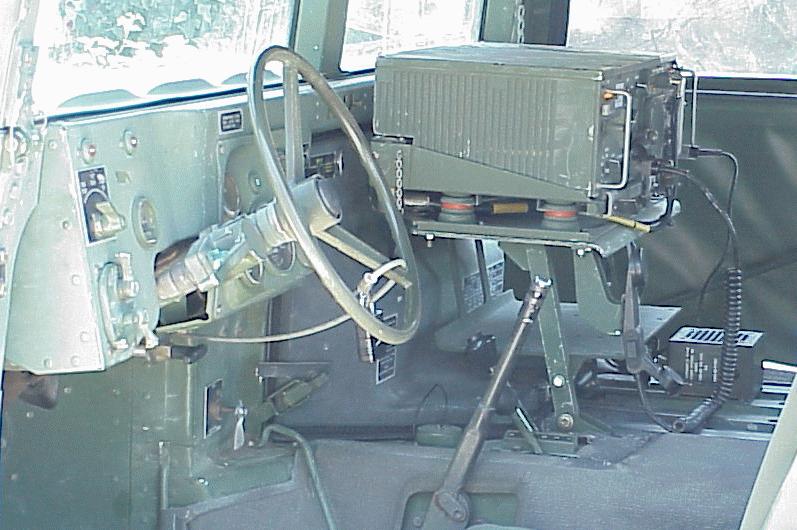 Here are some pictures of the AN/VRC-47 radio set that I installed in my truck. The large radio on the left is an RT-524A transceiver. The small radio on the right is an R-442A receiver. The lower shelf is for mounting a pair of KY-57 communications security devices (scramblers). I have the mounts and most of the cables for installing those, but I don’t have the devices themselves (yet…). I don’t yet know if KY-57 units are available on the surplus market, either intact or demilitarized. 8/12/00 |
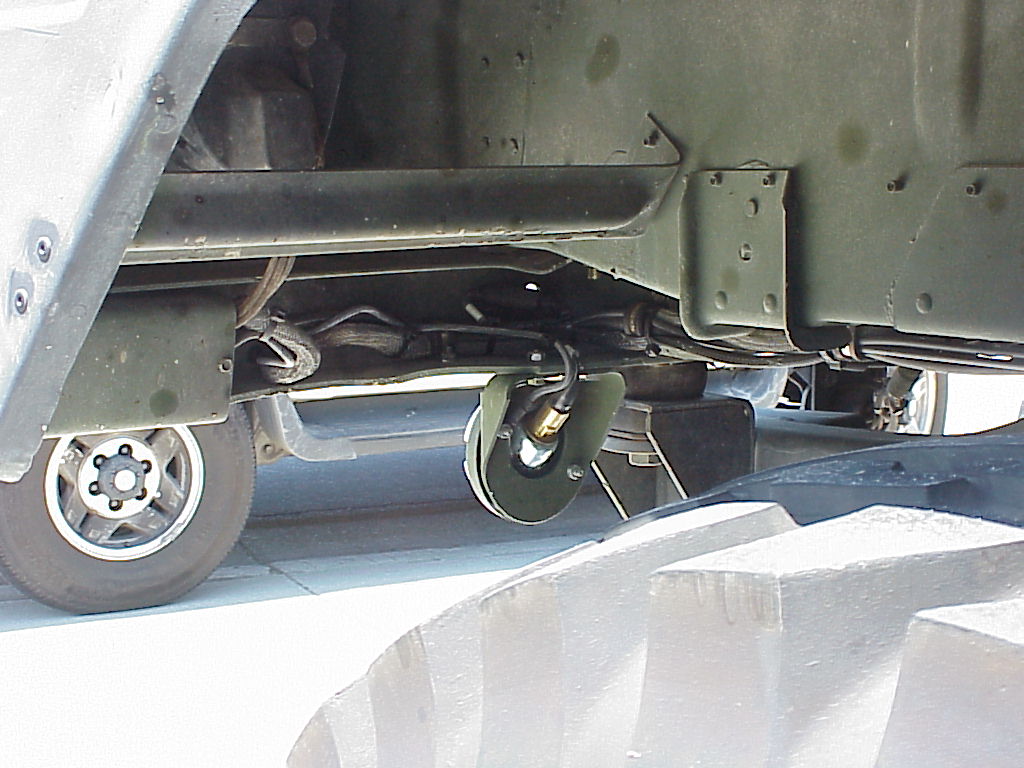
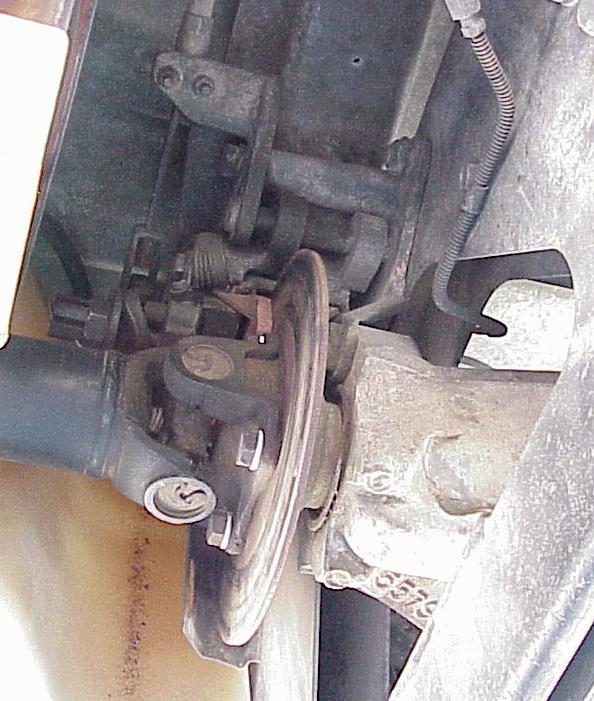 One of the differences between early military HMMWVs like mine and civilian Hummers is that the military trucks have a separate parking brake between the rear driveshaft and the rear differential. No special tools are necessary to change the rear service brake pads in these trucks. Civilian Hummers, as well as later or upgraded military trucks, do not have the separate parking brake, and instead apply the rear service brakes through a mechanical linkage when the parking brake lever is set. They require a special tool which rotates the brake pistons while compressing them to make room for new pads. 8/12/00 |
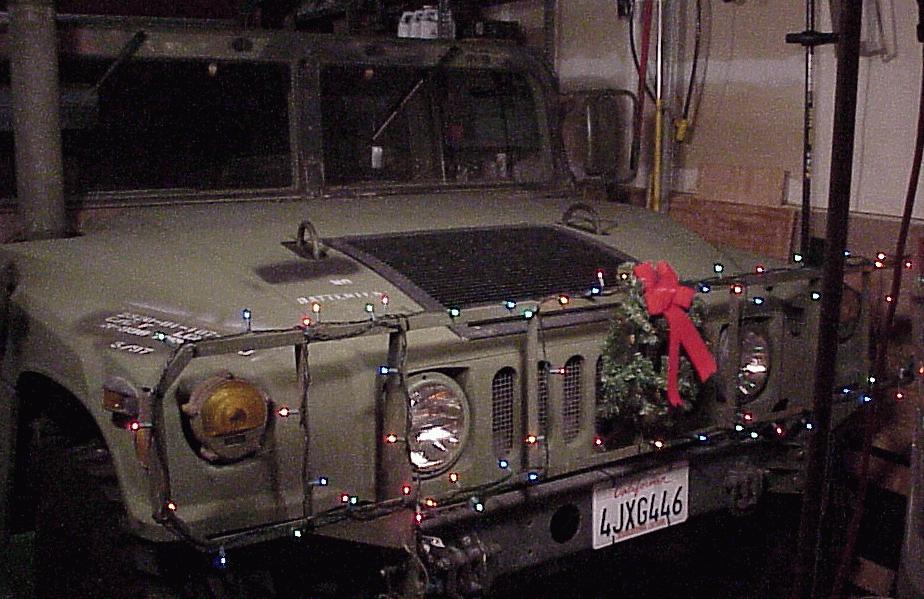 A 32 foot string of Christmas lights is just right for the brush guard, but a 14 inch wreath is a bit small! 12/5/00 |
 Here is an action shot of a HMMWV (not mine) rescuing a Mule that strayed onto deep water. The driver of the Mule, Dan Solis, made it out to the sandbar OK, but when he tried to drive back, he went into a hole and the bow wave went down the air intake and snuffed out the engine. To Dan’s credit, he had the Mule running within 45 minutes of being pulled out of the river. He said he had to do three oil changes to get all of the water out of the crankcase. Photo courtesy of Matt Tait |
 A while ago, I converted my HMMWV to a 2-door cargo/troop carrier. Here it is at a military vehicle club meet in Glendale, where I bought this 3/4-ton trailer. Photo courtesy of Brandon Kunicki |
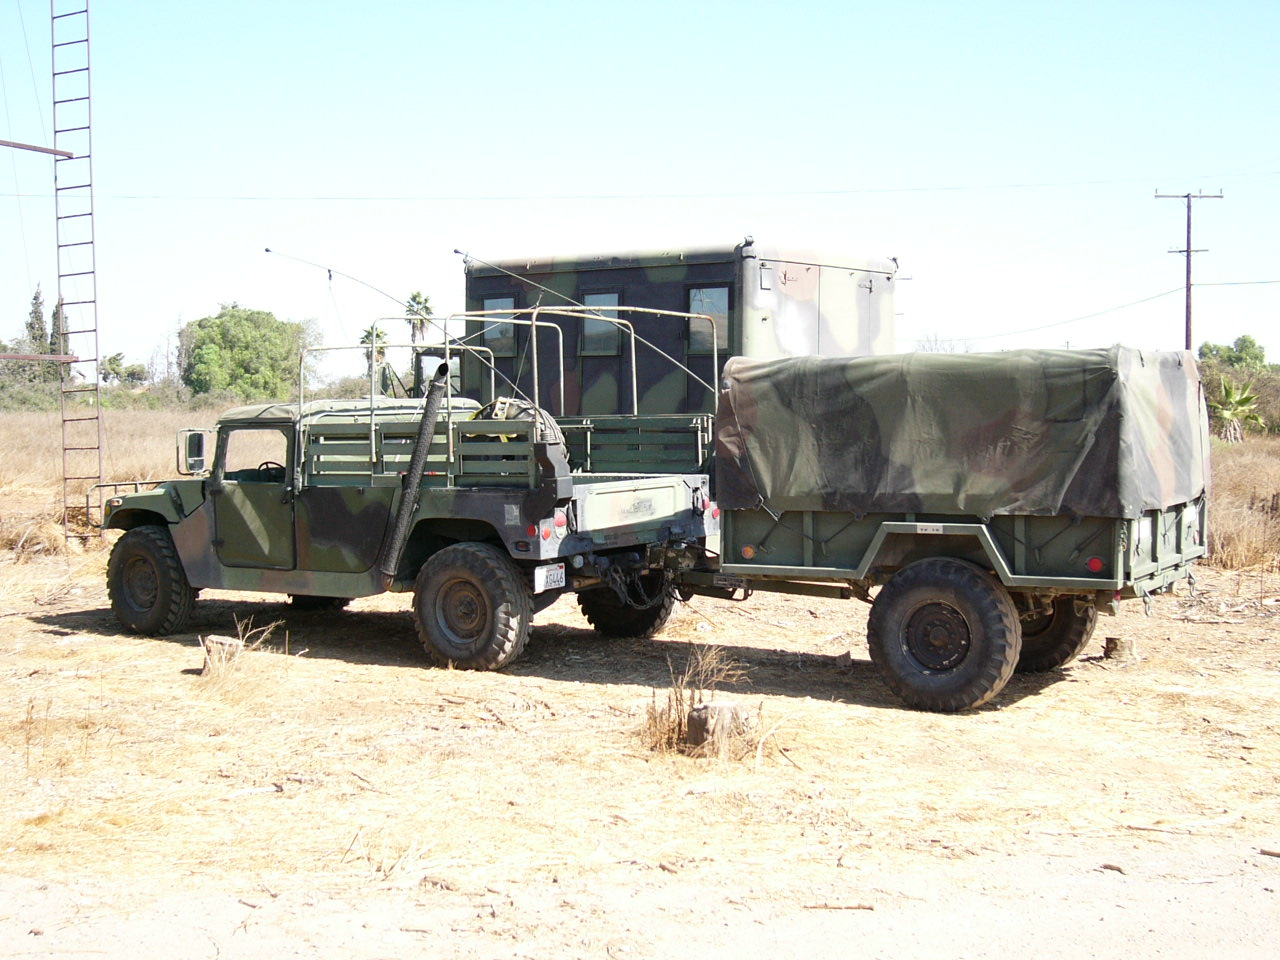 Here’s another view of the new 3/4-ton trailer. 11/7/03 |
 Now, I’m converting my truck to an M1037 communications shelter. I plan to install a generator set in the 3/4-ton trailer I bought recently, and use it to power the shelter. More details about this conversion are in the modifications section. 1/25/04 |
Modifications
Introduction
Here are some of the modifications I have made to my truck. In general, I like to keep my truck in a correct military configuration. However, some modifications were necessary to make it street-legal, for safety, and for convenience. Wherever possible, I made these modifications completely reversible, by using existing bolt-holes for mounting, and by making wiring adapters which tap in to the wiring harness without cutting any wires. Where I added wires, I used the correct connectors, obtained from Jeff Smith, and I used silicone-rubber motor lead (SRML) wire, which is very similar to the wire used in the HMMWV’s wiring harness. I sealed all crimped connections with adhesive-lined heat-shrink tubing, and covered wires with braided polyethylene tubing where possible for abrasion resistance. The Thin-walled adhesive-lined heat-shrink tubing and braided polyethylene tubing are available from Mouser Electronics, and many types of heat-shrink tubing, with and without adhesive lining and in various wall thicknesses, are available from McMaster-Carr.
Lighted Rear License Plate Bracket
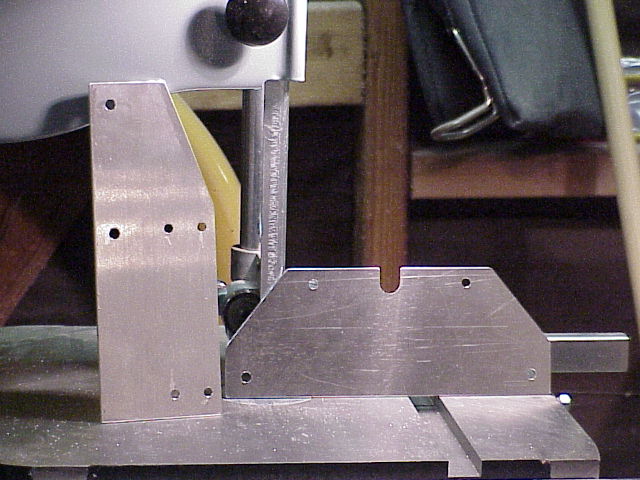
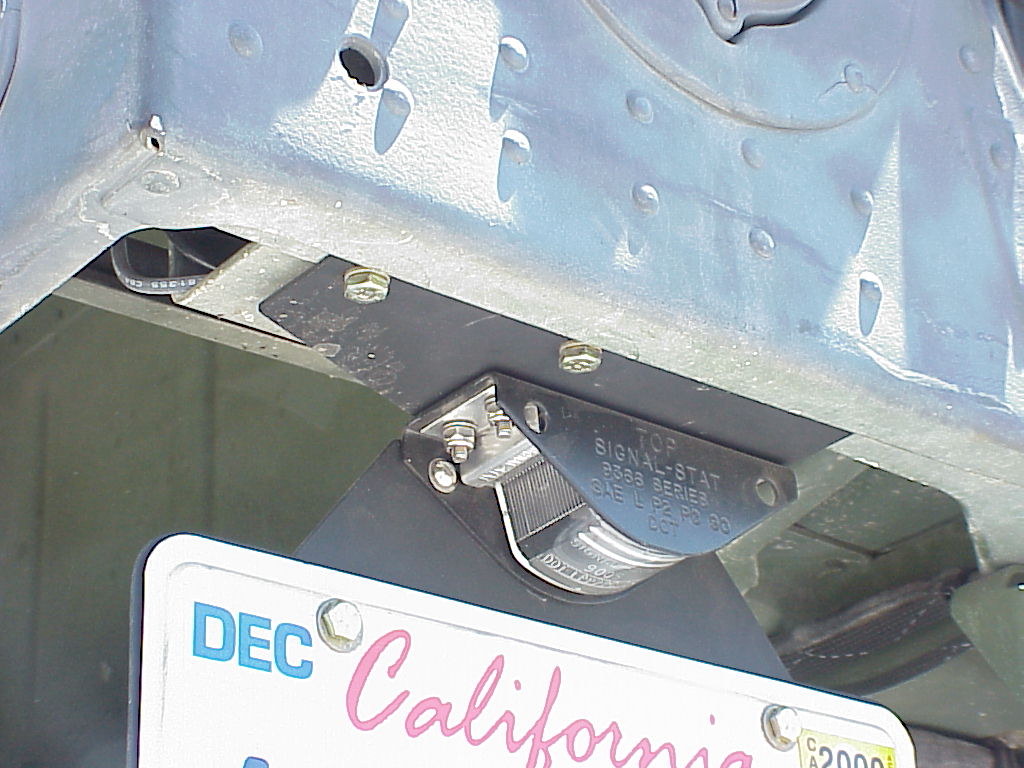
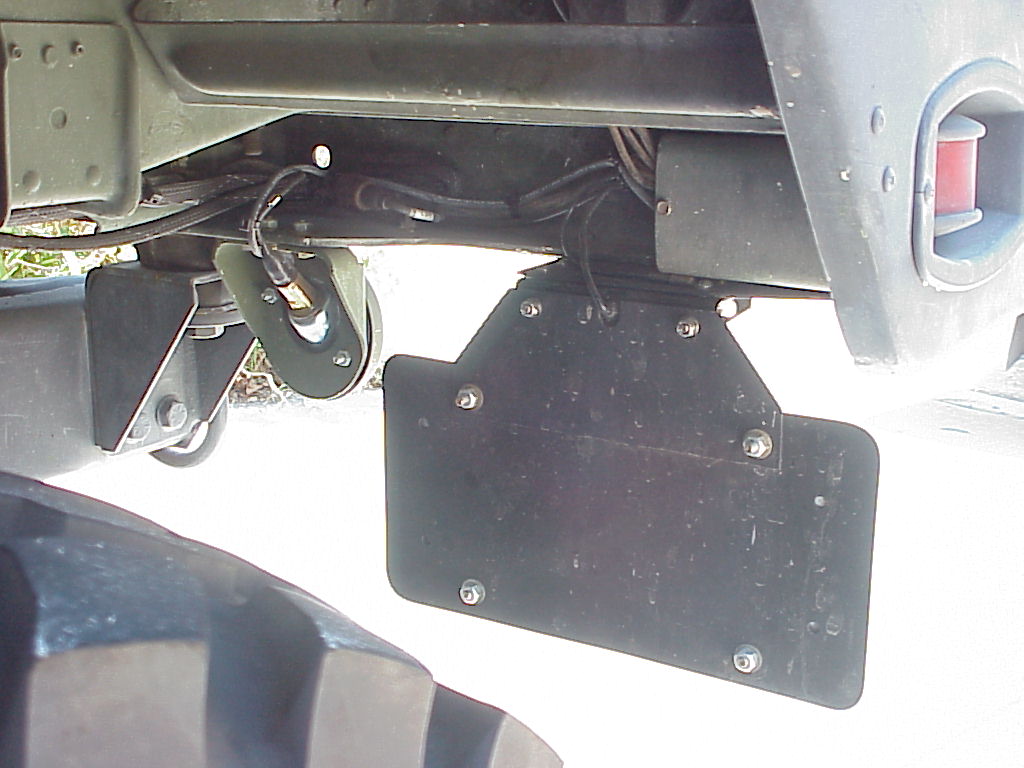
I fabricated mounting brackets out of some thick aluminum plate that I bought at a hobby shop. One bracket attaches to the top of the light housing at one end, and at the other end, it cantilevers out from the bolts which attach the U-shaped plate which protects the left rear tail-light connectors. The other bracket attaches to the rear of the light housing, and holds the license plate. I backed up the license plate with a thinner piece of aluminum. I painted all of the aluminum parts flat black. All of the hardware is either 1/4″ grade 8 hardware, or #10 stainless steel hardware, and the nuts are all locknuts.
This modification uses existing bolt holes and doesn’t require cutting the wiring harness, so it is completely reversible. People who display their truck in parades and shows may wish to use a different approach that is easier to remove for display, but I plan to use my truck as a semi-daily driver, and opted for a more secure mounting.
I did most of the metal work with a drill press and a metal-cutting bandsaw. It should be possible to fabricate a bracket like this one with hand tools, too, with a bit more effort. If you don’t have access to the correct connectors and crimper, you can cut off a wire lead and connector from a dead military headlamp. You’ll still need some sort of “Y” adapter if you don’t want to cut into your wiring harness.
I may make a bracket for the front license plate someday, but for now it’s attached to the front bumper with cable ties.
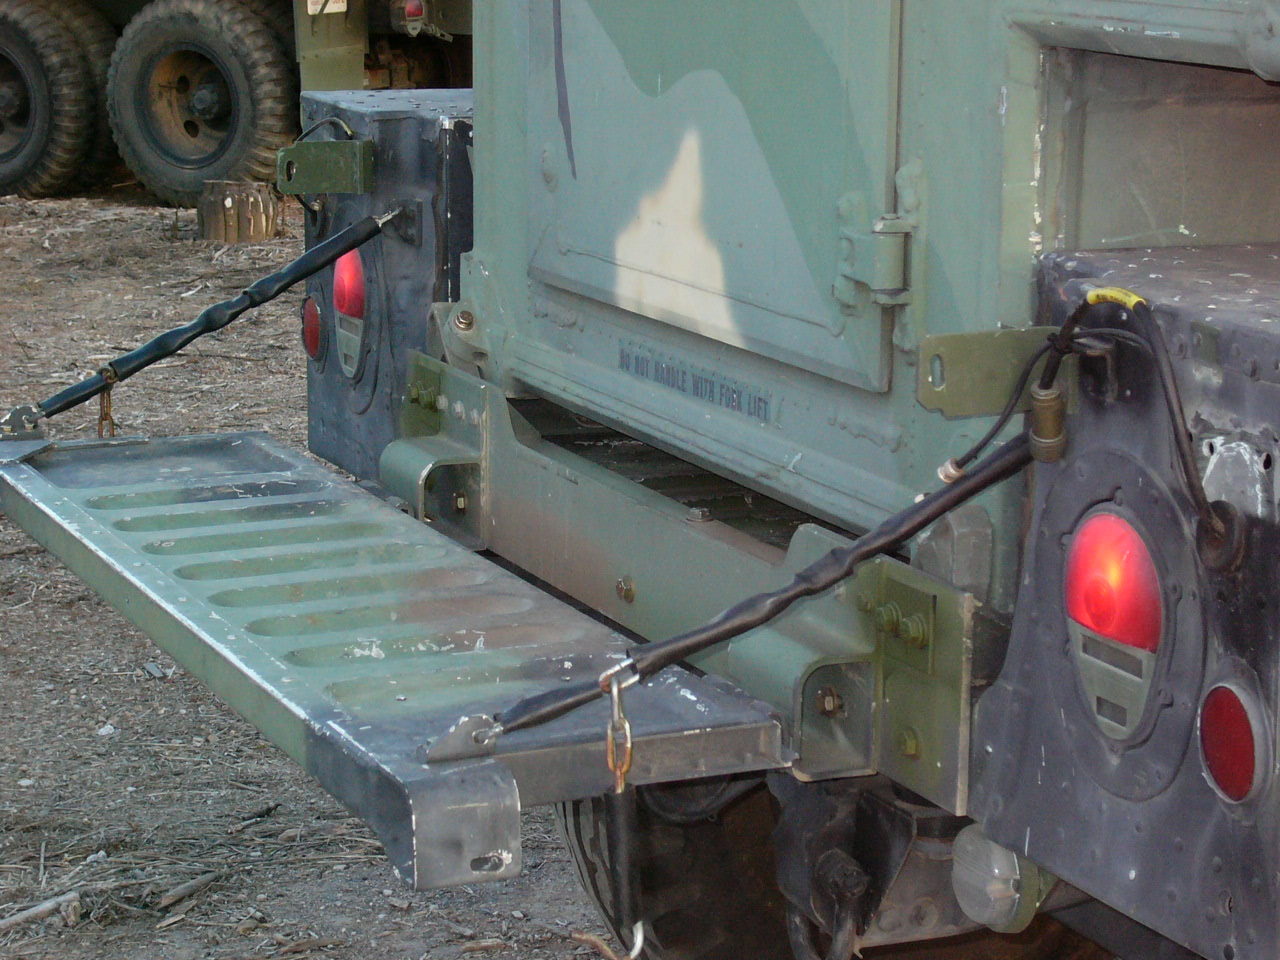
Backup Lights
I ordered the lights and brackets used in the two-litter soft-top HMMWV ambulance, as well as the backup light switch (not cheap!) from Surplus Enterprizes, and guessed where to mount them based on a scanned picture of one of the ambulances which another collector sent to me. The mounting holes for the brackets were not already present, so I needed to drill some holes in the horizontal lip at the lower rear edge of my truck’s body.
The rubber boot around the shift lever housing should have a nipple around the neutral start switch, and another sealed nipple where the backup light switch goes. It will be necessary to remove the shift lever housing in order to get the boot off and install the switch. Be very careful, because the boot will probably be firmly stuck to the body, and it’s thin and tears easily. I tore mine and needed to replace it, and it is not cheap! It’s a big pain in the butt to remove and install the shift lever housing because of the contortions necessary to reach the lock nuts under the body through the engine access cover. I decided to ream the mounting holes in the body out and install 1/4″ rivnuts, so it will be a lot easier to remove the housing in the future. You may need to cut off the end of the nipple for the reverse switch, but my boot was the ambulance version, with the nipple end already cut off.
I had to make a separate wiring harness for the backup light switch. I did not want to cut into my wiring harness, and I wanted the blackout lighting system to continue to function properly. In ambulances, the backup lights derive power from the same electrical net that powers the horn (since the horn is shut off in blackout mode in a HMMWV), so I simply tapped my backup light power from the horn at the front of the truck. I used SRML wire, and covered it with braided polyethylene tubing. This time, instead of using a pre-made “Y” adapter, I built my own Y adapter into the end of the front wire. I spliced the two short leads with connectors to the longer lead with a special butt splice which is made for connecting a large wire to a small wire, or two wires to one wire of the same gauge. I got it from McMaster-Carr. I covered the splice with adhesive-lined heat-shrink tubing. I used the same technique to make the “Y” where the two backup light leads and the long wire from the switch join together. Each backup light has its own ground wire connected to the grounded lug on the nearest marker light. I routed the long wires along the existing wiring harness (that wasn’t easy!), and secured it to the existing harness with black UV-resistant cable ties.
Storage
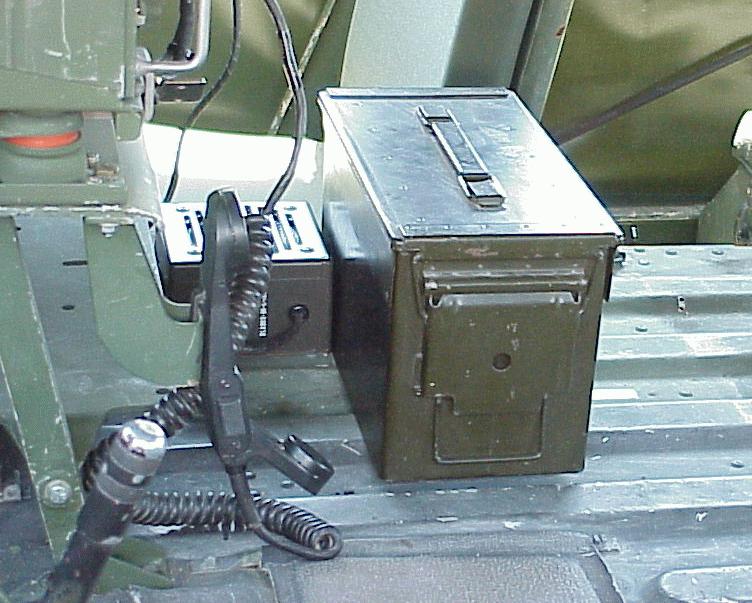
For a glove box, I simply drilled two holes in the bottom of a .50 caliber ammo can, and bolted it to the floor of the truck using the two existing rivnuts where a fire extinguisher would go. I plan to mount a fire extinguisher in the alternate location under the front of the driver’s seat. I may modify the box later to make it lockable.
For a lockable trunk, I bought a Knaack Model 32 jobsite storage chest. I chose this chest because I liked the way it was made, and Knaack has good dimensional drawings on their website, including the height of the box with its lid open. That was a critical dimension when determining what box might fit in my truck. The Model 32’s lid handle lightly scrapes along the inside of the cargo cover when I open it, just because the cover sags down a bit, but I don’t think it’ll scuff the cover. I drilled small holes in the feet of the chest, and then drilled larger holes inside the floor of the chest so that I would be able to get at the smaller holes from inside the chest with a wrench. I bolted the chest to a piece of 3/4″ plywood (painted 383 green, of course!) with bolts and tee nuts, and then bolted the plywood to the floor of the truck using the existing tiedown ring mounts. I covered the large holes inside the chest with plates of thin aluminum, glued in place with silicone, to keep small stuff from getting trapped in the chest’s feet. I suppose somebody could unbolt the plywood and walk off with the chest, but it would take a while to do that, and I plan to keep that chest nice and heavy! Eventually, I plan to paint the chest 383 green, but I was in a hurry to get it installed in time for my trip to the 2000 MRCG Meeting.
I mounted the chest far enough forward to allow a spare tire to fit between it and the tailgate. Someday, I might make spare tire mounting bracket that I can attach to the chest.
Security

Of course, I have other methods for securing my truck, but I won’t share those… :-)
Conversion to M1037 Shelter Carrier
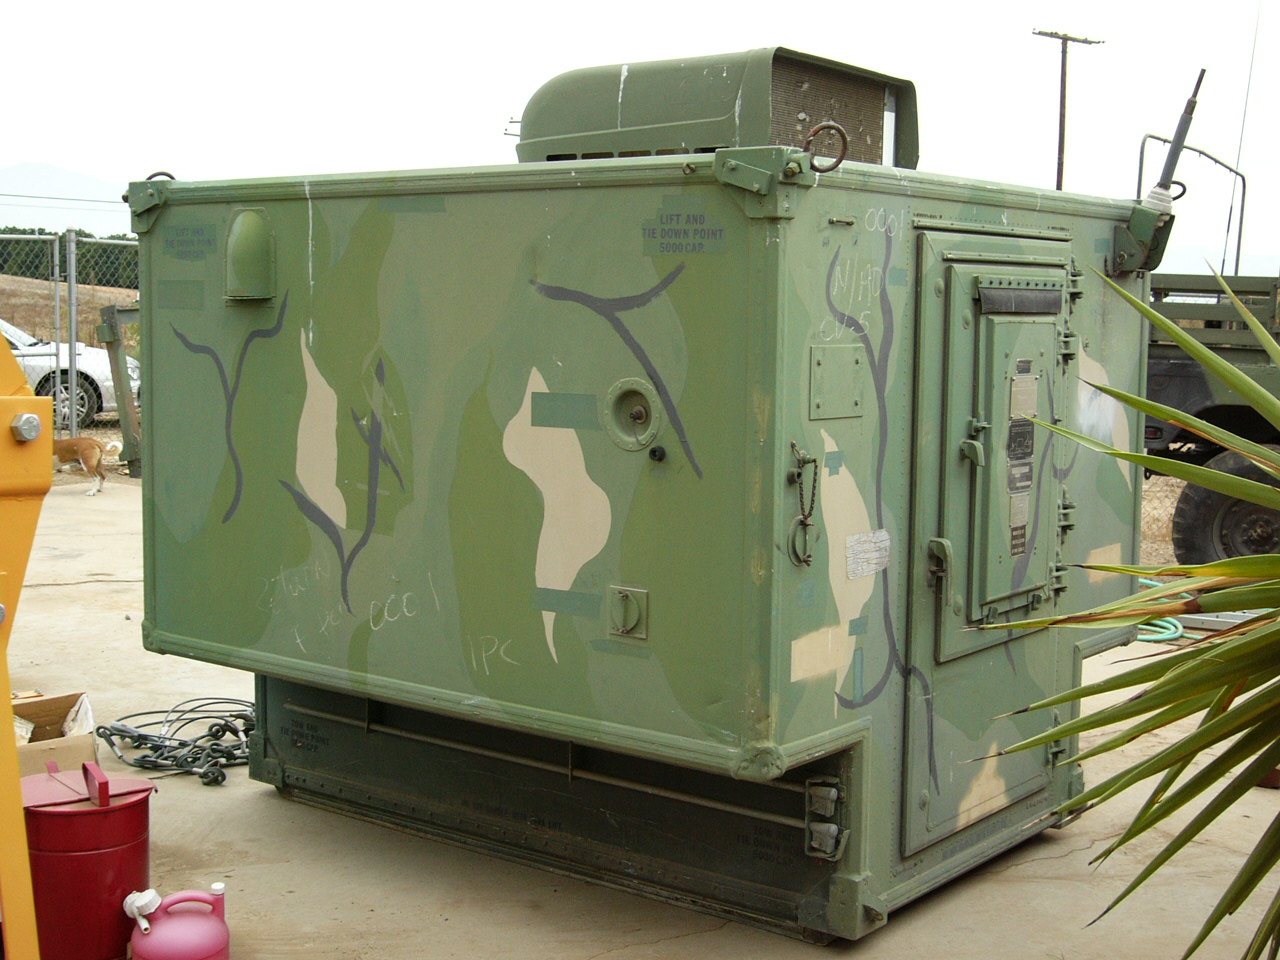
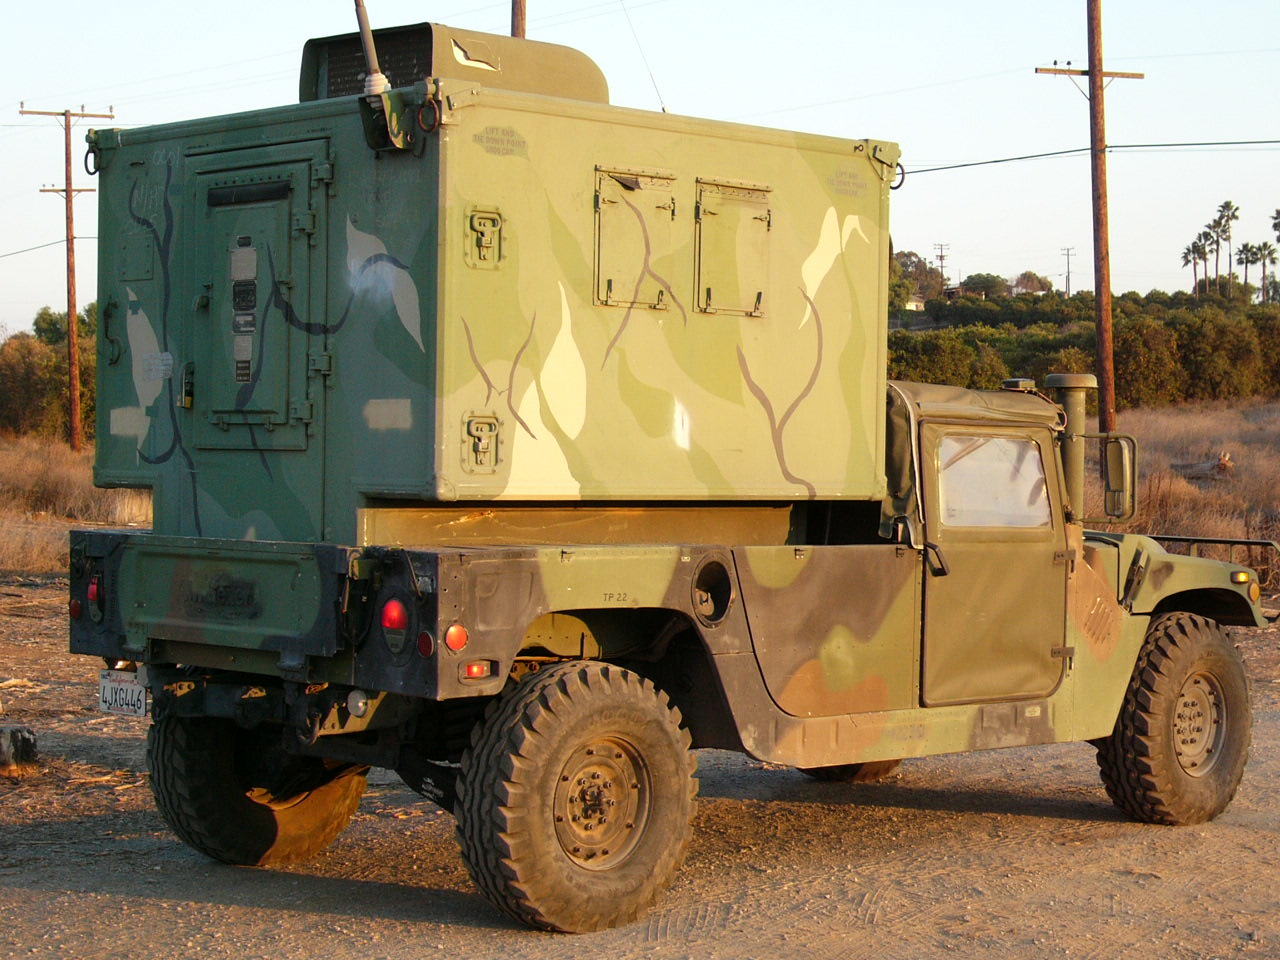
Now, I’m converting my truck from an M998 cargo truck to an M1037 communications shelter carrier. It will carry this S-250/G shelter, containing an AN/GRC-122B radio teletype (RTTY) set.
There’s supposed to be a pair of panels which close off the rear footwells from the front seats in this configuration. I don’t have them yet, but I have located a set.
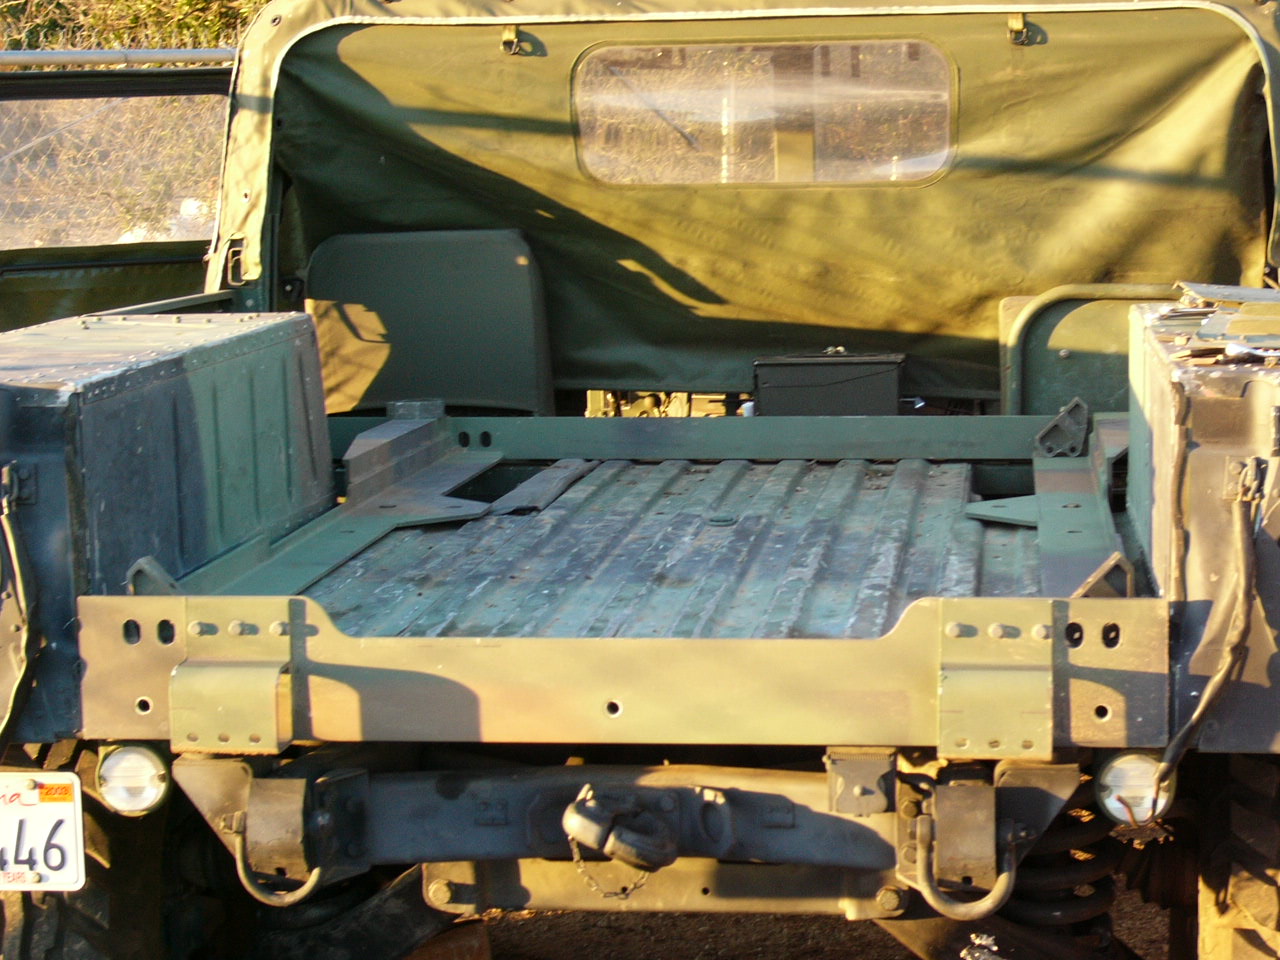
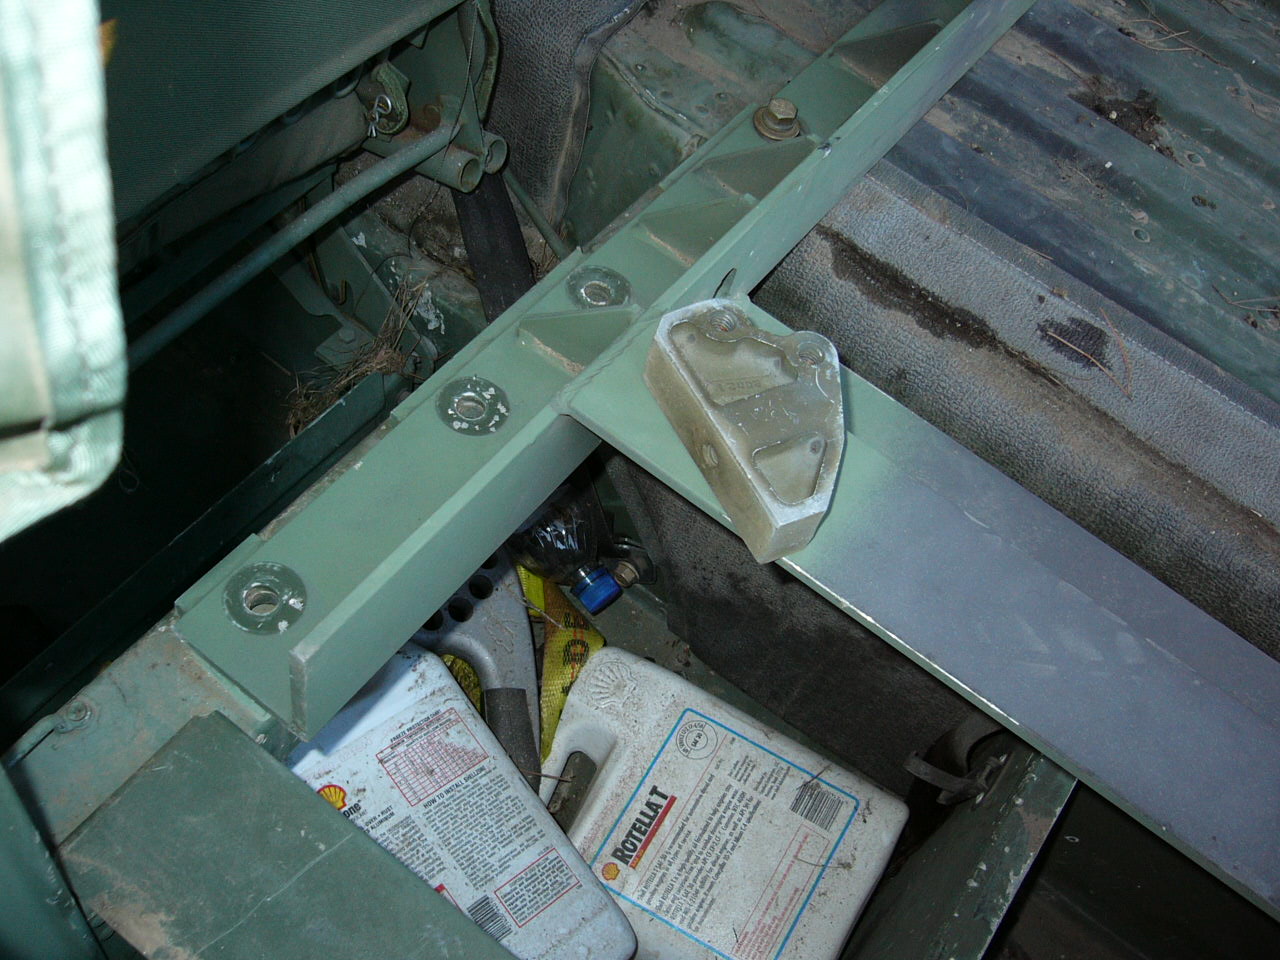
Here are some pictures with the shelter mounted on the truck. I still need to install the footwell plates and rear bumper, and realign the suspension. I’ve removed the radios to fix them. I’ll take pictures of the shelter interior after the radios are reinstalled.
Timeline
| 12/21/1999 | Bought the truck. While attempting to drive the truck to the truck scales to get a weight certificate, it stalled and refused to start (it started working again later). I had it towed to the hangar where I keep my M109A3 shop van, and I plan to start working on it after Christmas. It appears to have intermittent electrical and/or fuel system problems, but the engine sounds good and does not smoke. |
| 1/2/2000 | The electrical problem may have been caused by bad battery connections and loose alternator belts. The fuel problem will be harder to fix, because it looks like the fuel injection pump needs to be rebuilt. |
| 1/16/2000 | I finished replacing the fuel injection pump today. It runs! Replacing the pump is a big pain in the butt. It’s necessary to remove the intake maniford first, and it’s not easy to work on a HMMWV engine. I don’t think the truck will need too much more work to be fully road-worthy. I bought a 4-passenger top kit and cargo area cover, and the mirrors should be here in a few days. I picked up a take-off fording exhaust stack, but I still need an intake snorkel. |
| 1/22/2000 | The truck seems to be running pretty well now. I gave it a bath, installed the mirrors and wiper arms, bolted on a beat-up surplus fording exhaust stack, and began working on installing the soft top. The connection between the battery current shunt and the alternator/chassis ground cable was loose, and made some pretty sparks. Monte Bowe’s truck had the same loose connection, so maybe it’s a common problem. I can’t finish installing the soft top until I get some replacement wellnuts for the windshield frame and B pillar. I’ll also do without the cargo area cover for a while, until I fabricate the metal plates which reinforce the body around the mounting brackets. |
| 1/26/2000 | After servicing the parking brake, I took my first “real” on-road trip in my HMMWV late tonight (that short first trip out of the auction house yard, followed by a stall and a tow, doesn’t count!). I just went down to the nearest gas station, hopped on the freeway briefly, and returned to the hangar (about 10 miles round trip), but I’m pretty happy that the engine ran and nothing important fell off. I think it’s just because of the tread pattern on the military tires I’m running, but the truck really wants to wander around on rough pavement. |
| 1/28/2000 | The HMMWV makes it home! My M998 finally made the 30-mile-long trip home from the hangar where I’ve been working on it for the last month. I started around 9:30 PM, taking a chance that the darkness wouldn’t be a problem in order to avoid heavy traffic. Most of the trip was on a very hilly freeway through an uninhabited stretch of mountains. At least one wheel seems to be badly out of balance, so I had to keep my speed under 55 MPH so the truck wouldn’t get too squirrelly. Several times on uphill segments, the engine started making a loudroaring sound. I think it was probably the fan turning on, but the jury’s still out. There was a plastic-burning smell, and I have not found a cause for it yet (maybe a slipping belt?). I pulled over three times at call boxes to count the wheels, look for smoke, see if any of the tires seemed too hot, let the engine cool a bit, etc. Two of my stops were right before toll booths, so at least I was in lighted areas those times. All in all, it was an exciting trip!Upon arriving home, I managed to get the truck into my garage without removing the fording exhaust stack or hitting any walls… I was a bit surprised that I actually shoehorned it in! I did need to detach the garage door opener carriage to get the door open far enough to clear the exhaust stack. My downstairs bedroom (and future radio room) has been extended into the garage, so there’s really only room for one vehicle… and a HMMWV is a bit more than one vehicle!Inspecting the truck after my arrival, I discovered that one of the brand new grade-8 locknuts I used to re-fasten the exhaust crossover pipe cracked in half… that’s a puzzler, because I even torqued them to spec with a torque wrench. I noticed a bubble in the plating on the lower metal coolant pipe (where the drain cock is). Light finger pressure crunched it, and a few drops of bright green coolant came out! Eeeek! The radiator hoses feel pretty crunchy, so I think I ought to just replace that pipe (I bet it isn’t cheap!), all of the radiator hoses and the thermostat, and flush the radiator. I also want to test the fan to make sure its clutch works right. I plan to disassemble all of the wheels, remove the run-flats, replace tires as necessary, and have them balanced. It’ll probably be a while before my truck takes its next trip… between the bad smell and the rust-through I found on that coolant pipe, I think my truck was lucky to make the whole trip under its own power!
I bet my neighbors will freak when they see that HMMWV in my garage… hee hee hee! :-) |
| 2/3/2000 | I finished installing the cargo area cover tonight. The truck looks pretty sharp, now! The right rear eyelet on the rear curtain won’t stretch far enough to go over its footman loop, so I may need to move the loop over a half inch or so. I think that the burning plastic smell that showed up on the drive home was caused by a plastic label I found on the side of the muffler (which appears to have been replaced). I probably hadn’t gotten the exhaust system hot enough to cook it before. Folks tell me that the loudroar is normal, and is caused by the engine cooling fan, which is controlled by a hydraulic clutch and a solenoid valve.Yes, my neighbors did, in fact, freak. :-) |
| 2/5/2000 | While lubing the chassis, I discovered that the bolt holding the left radius rod (like a tie rod, but sets the toe-out of the rear wheels) to the chassis was very loose, allowing the rod to rattle around. After jacking up the left rear wheel, I found that I could easily “steer” it about 1/2″. Yikes! That would sure explain why the truck wanted to wander all over the place on the trip home last week. It would also explain why the left rear tire is worn out, while the other three look pretty good. I tightened the bolt back up, and I guess I’ll be learning how to do a 4-wheel alignment soon! On a brighter note, all four pairs of ball joints seem to be OK. |
| 2/27/2000 | This afternoon, I finished disassembling, inspecting and remounting the right rear tire and both front tires. I wanted to remove the runflats, and also inspect the tires for runflat damage, so I would know how many new tires I will need. The left rear tire needs to be replaced; it’s worn out by the alignment problem, and it has too much dry rot for use as a spare. I didn’t bother removing it; I’ll do that when I get a replacement. The other three tires look OK on the inside, but the front right tire has a 1/16″ diameter, 3/16″ deep hole in the sidewall. The hole doesn’t go all the way through, and doesn’t leak, but that tire might want to become the spare, anyway. Remaining tasks:
|
| 3/26/2000 | It’s been a while since I updated the status page, but I’ve been busy. In no particular order:
|
| 3/29/2000 | I decided to take a few days of vacation to work on my truck. Today, I picked up a couple of new tires I ordered ($300 each… Ouch!), installed a new lower coolant pipe, and flushed the radiator. I backed the truck out of the garage to run the engine right as the neighbors’ kids were getting home from school. My house was very popular today! I let the kids climb over the truck, because I knew they’d never leave me alone otherwise. I can go back to being grumpy tomorrow. |
| 4/1/2000 | I’ve been busy in the last few days. I had planned to replace the outer end of the left radius rod (the same rod which was loose before, and thus would need to be adjusted), because its dust boot was torn wide open. I was unable to get it to budge in the adjuster sleeve. After hours of torching, Liquid Wrenching, hammering and cussing, I managed to get the other end to turn about a half rotation… I gave up, and had George Pretty [no longer in the HMMWV parts business]express me a whole new rod (I’d rather waste my money than my blood and skin!), which I received this morning. I put plenty of anti-seize on its threads, and it was easy to turn by hand after installation. Ironically, it was almost the correct length when I installed it, and the right radius rod needed the most adjustment. Luckily, I got its sleeve to turn with some Liquid Wrench, a bit of rapping with a hammer, and all of my weight on a pipe wrench.I finished the alignment today, and over the last few days I’ve also replaced both front tires, installed the radio tray, mounts, antenna bases, and wiring, re-installed the transmission hump padding, bolted an ammo box to some existing rivnuts on the hump between the front seats for use as a glove box, removed the cargo bulkhead (it turns out that it interferes with the rear seat transmission hump padding), changed the fluids in both differentials and the remaining hub gearbox, and made lots of other minor fixes. I think that I’ll just need to balance the wheels to get the truck fully road-worthy! I hope I have enough energy left to do that tomorrow.While test-driving my truck today (for the first time in months!), I noticed that there seems to be a lot of gear noise coming from the back of the truck… I hope that’s normal! I sure got some funny looks driving that HMMWV around the neighborhood! (Hee-Hee!)
Future projects include installation of backup lights (waiting on connectors and a crimper), installation of the radios (waiting on the radios and one antenna whip element… the rest is all there, and they should just drop in the mounts), fabrication of a front license plate bracket (cable ties for now!), looking into a very slow leak from around the transmission, mounting a spare tire (I’ve put that off until I have a pro take a look at the non-penetrating sidewall hole in the tire I plan to use, and tell me whether it should be patched or left alone), and fixing some butchered and/or decayed wiring around the alternator. I think all of the major stuff is almost out of the way, other than any new bugs which might get shaken out during the next 500 miles or so. |
| 4/2/2000 | I didn’t have enough strength left to balance the wheels today, so I changed the transfer case fluid and the transmission fluid and filter instead. That was a messy job! I’ve been told by an experienced HMMWV rebuilder that my rear-end noise is normal, so I guess my truck is fully road-worthy, except for needing its wheels balanced. I’ll do that soon, but I don’t see why I shouldn’t drive it to work tomorrow. WOO-HOO!! I took it for a 10-mile test drive this evening, and it seems to be running well. |
| 4/15/2000 | Since the last entry, I’ve finished installing the radio (an AN/VRC-47, a member of the VRC-12 series of radio sets, and consisting of an RT-524A transceiver and an R-442 auxiliary receiver), installed backup lights, and balanced the wheels. I tried to mount the spare tire after the tire shop looked at it and determined that the sidewall hole didn’t go all the way to the cords. Unfortunately, the surplus wheel I bought a while back failed the feeler gauge test. I recycled it as a portable antenna base. To secure my vehicle, I decided to use a Pit Bull Tire Lock. Its jaws didn’t open quite far enough to go around those big HMMWV tires, but I made it work by cutting off the protruding part of the steel core from the inner (larger) jaw. The backup lights are from an M1035 HMMWV two-litter soft-top ambulance. They’re not correct on an M998, but I think they make the truck safer to drive, and at least they’re from a HMMWV. I tapped power for them from the horn, so that the backup lights will only operate when the lighting system is turned on (just like the HMMWVs which are supposed to have them). I’ll add new pictures showing the antennas, radios, intake snorkle and backup lights someday, when I get around to it. My truck seems to be running great! |
| 5/7/2000 | Last Thursday, I drove my HMMWV up to the annual Military Radio Collector’s Group meeting in San Luis Obispo, CA, about 250 miles north of my home. It was a lot of fun, and I happened to meet many other HMMWV collectors. Unfortunately, it looks like my truck developed a head gasket leak, so it didn’t make it back home. I had it towed to the workshop of Bob, an expert HMMWV rebuilder in nearby Santa Maria, CA (about 200 miles north of my home), and he’s agreed to take on the job of replacing the head gaskets. Since replacing the fuel injection pump is about 3/4 of the same job as replacing head gaskets, I know that I could do the job myself… and I also know that I don’t want to! :-) ALT=”smiley”> Bob says that the noise coming from my rear end is not normal. That’s both good and bad… it means that I’ll be doing some more repair work once my head gaskets are replaced and I drive my truck back home, but it also means that I can make that !@^* noise go away! On the brighter side, even with a leaking head gasket, my truck still starts more easily and runs better than most of the other HMMWVs I’ve seen. I’m crossing my fingers that I’m just working the last few kinks out of it now. |
| 6/25/2000 | My truck’s out of the truck hospital, with a new pair of (surplus) cylinder heads and new head gaskets! I’ll drive up with a friend of mine next weekend to pick it up. A few of its friends threw it a party to celebrate it’s successful recovery. Once it comes home, it’ll need a bit of rear differential surgery, but it’s getting pretty close to being in top health. While I have the gearbox out, I might as well service the rear CV joints and replace their boots. I plan to do the same to the front, but I figure I’ll need to drive it a bit more first once I get the rear end all fixed up. I can’t wait to get my truck back home! While I’m up in Santa Maria, I’ll definitely make the trip up to Jocko’s for some of the best steaks in the world. |
| 7/7/2000 | I drove my truck home last weekend. It’s great to finally have it back in my own garage! It runs great at speed, but it now smokes and runs roughly at idle, especially when cold. I hope that new problem won’t be hard to fix. It has developed a power steering pump leak, and I need to replace one of the alternator brackets. I plan to do both of those things before I do anything else. Then, I need to flush the cooling system and refill it with the right antifreeze mixture, and then get to work on the rear diff. After that, I want to install the 3-point seatbelt mod (that’s neither cheap nor easy!), and then work on lots of other little things. It never ends… :-) I replaced the shorted windshield washer pump with a NOS replacement, but I haven’t done anything else to it. I think I’ll let it sit in the garage for a while before I get started, while I work on other neglected projects. I’m kinda sick of dumping time and money into it for now, so it’s time to take a little break! I’m sure it won’t be too long before I’m swinging wrenches at it again. |
| 7/29/2000 | I ignored my HMMWV for a spell, while I worked on my commercial driver’s license for my 2.5-ton van (and that’s still in progress!), but I’ve finally started working on it again. I pulled out the alternator a couple weeks ago, repainted it because of some surface rust, and replaced the missing fan guard. That wasn’t much work, but today I got serious, pulling out the power steering pump and cleaning and rebuilding it. Its seals were all shot, but it looks OK otherwise. The seals kit is pretty cheap, but it takes a fair amount of labor to pull it out, clean it up, and replace the seals. Next time I work on it, I’ll install the power steering pump and alternator, and fix some ratty alternator wiring. My truck should be running again then, so I can flush the cooling system and go get some fuel… then it goes back up on jack stands so I can rebuild the rear diff! I haven’t decided whether I’ll do that myself or take it to a diff shop. As long as I have it out, I’ll probably replace the rear CV boots and check out the rear CV joints. |
| 8/5/2000 | I got my truck back together today, and flushed the cooling system. It felt good to drive it again after a month, but I don’t plan to drive it much more until I rebuild the rear diff. While flushing the cooling system, I discovered that both of the 3/8″ hoses which run from the high spots on the radiator and the engine to the surge tank were plugged up at the surge tank nipples. These hoses let air escape from the radiator and engine and go to the surge tank, rather than getting trapped. In the “rinse” cycle of the chemical flush, I got about a mile from home and then my temperature shot up to 240°F. I think there was a big pocket of trapped air in the radiator, and then when my thermostat opened up it burped up to the surge tank and the water level in the engine dropped. Now that they’re clear, I can get the coolant level right on the first try. The next step is to rebuild the rear diff, but I might wait a while before I start spending time and money on that. |
| 10/20/2000 | Well, I finally fixed that rear diff, and my truck is fully road-worthy again! I took the diff in to the local Hummer shop to have it repaired. One of the bearings on the input shaft broke, but the gears were all still OK. I had them replace all of the seals and bearings. I reinstalled the diff a couple days ago, and test-drove the truck this evening. No more ear-plugs! Woo-hoo!It’s still hard to carry on a conversation in this truck, but now that the rear diff isn’t howling any more, I no longer need to wear hearing protection in when I drive it.I guess the next major task is to install the 3-point seat belt modification. There are a few other minor things to do to it, too, but the truck is basically fully road-worthy now! |
| 10/27/2000 | I’ve suspected for a while that my brake light switch wasn’t working quite right. I temporarily installed an indicator light so that I could see when my brake lights come on while I drive the truck. Due to pitted contacts (I’m guessing), I cannot adjust the switch to turn the lights on fully with light brake pedal pressure, but turn them off when I release the pedal. Last weekend, I made a bracket out of some hunks of metal and temporarily installed a snap-action lever switch in place of the original switch. It works well, but isn’t waterproof, and isn’t very sturdy. I have the right switch on order. I’ll also replace the plastic bushings on the brake pedal mounts, because one is broken. While I’m at it, my truck needs a new hand throttle cable, too.Today, the seat belt latch at the driver’s position finally gave up the ghost. The other three aren’t far behind, judging by the condition of their plastic parts. My parts dealer doesn’t have the 3-point upgrade kit for the front seat in stock right now, so I just temporarily replaced the driver’s seatbelt with a cheap non-retracting belt from Pep Boys. |
| 11/12/2000 | My truck still smokes and rattles a bit more than I like when started cold, but otherwise it’s running really well. I’ll check the glow plugs a bit more carefully soon. If that’s not the cause, then I’ll just live with the smoke. I replaced the bad brake pedal switch. I thought one of the brake pedal bushings was broken because of some play in the pedal, but it turns out that the play is just because the hole in the pedal bracket is a bit larger than the pivot pin. I replaced the bushings anyway as long as I had it apart. I also discovered that my hand throttle cable wasn’t in such bad shape, after all, so I guess I didn’t need to replace it after all, but as long as I bought a new one anyway… I need to stop being so picky and just drive the @^$! thing! :-)I got a surplus brush guard from eBay recently, and I installed it tonight. The guard and one of its brackets are a bit bent, but I figure that give it character. The guard is one of those wimpy early-model military ones, but it should work out just fine since I don’t plan to do any really serious off-roading. No pictures yet, so you’ll need to wait until I have another reason to take a new picture of the truck if you want to see it. :-) I also got a pioneer tool rack there, but I’ll leave it off the truck until I have some tools for it. |
| 1/21/2001 | Well, it looks like my brand new brake light switch has failed just like the last one, so the brake light won’t come on unless I put a lot of pressure on the brake pedal… much more than I use in a normal stop. If I readjust it to turn on with light pressure, then it won’t reliably turn back off. I believe that this is a design flaw. A rotary switch should not be used in that application, because the edges of the contacts will arc, heat up, and get pitted when the brakes are lightly applied, thus creating a high-resistance area between “on” and “off”. I’ve put that home-made bracket and snap-action switch back in. I’d like to replace it with something a bit less chees someday.I also installed my surplus military GPS receiver and its external antenna recently. The antenna is on a home-made bracket mounted behind the snorkle support bracket, and the GPS receiver hangs from the roof just to the right of the driver’s seat. While I was at it, I added a dome light to the bracket that I made to mount the receiver. That’s a lot nicer than fumbling for a flashlight in the dark. Surprisingly, this installation required no holes or other permanent modifications. |
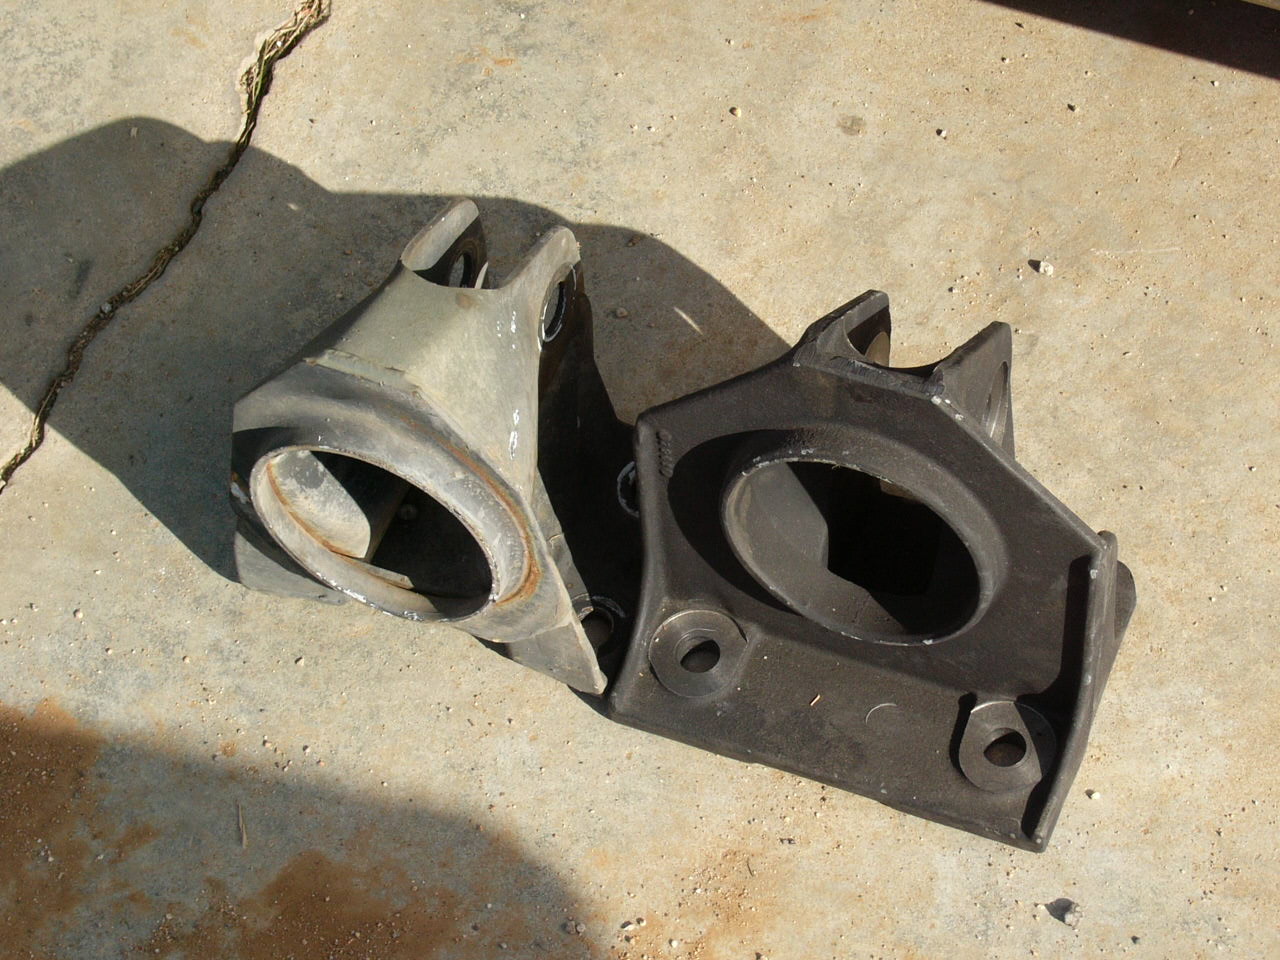
| 1/2/2004 | I’m converting my truck to an M1037 shelter carrier. I have an S-250/G shelter containing an AN/GRC-122B radio teletype set which will be mounted on the back of the truck. This conversion includes replacing the rear suspension with heavier-duty components, mounting a special frame in the bed, relocating the tailgate to the end of that frame, and other modifications. |
Great story! I heard that originally, the USMC let go of roughly 800 m998’s some time ago and I am sure they have been shotgun blasted all over the place. I am interested in picking up a 998 to fix up and use around the property. Where should I start to look? Do you have any contacts or know where I can start my quest?
Thanks in advance!
Yes, those trucks entered the civilian market around 1999-2000, so they’re all over the place now. I think that almost all of the military HMMWVs now in US civilian hands came from that batch. Nowadays, the best sources that I know of to find one of them are on eBay and in the classified ads on the Steel Soldiers forum. Good luck!
go to govplanet.com government auction has lots of hummers / M998
Hey is it for sale I’m hoping on getting a hmmwv for my first car let me know
It’s not for sale, but HMMWVs show up on eBay pretty often. Also, take a look at the classified ads on the Steel Soldiers web site. Plan to spend about $30k-$45k.
Well I had one in my sights which was just like yours for 14k
Sounds like a great deal! You should buy it.
It’s already been bought tho :( so I’ve been looking at military surplus hmmwv
Good day sir, my name is Michael Kane and I work for a Police Department, we have recently obtained an up armored Hummwv and the suspension was never changed to the heavy duty springs and shocks. Everything has been done so far except after we bought the heavy duty springs and shocks, we were told that they would not fit with the original equipment. I noticed you changed out the rear springs and shocks and I understand what I need, however I was wondering if you have to change the same parts out in front as you did in the rear, to make the heavy duty parts work. Any assistance you can give in this matter would be greatly appreciated.
Thanks for your Time
Michael Kane
Hi! I upgraded my rear suspension to the heavier-duty components normally used on the shelter carrier configuration. I don’t know if those are the same components used on up-armored trucks, but the necessary modifications might be similar. In my case, I didn’t need to change the front suspension.
Before I did the upgrade, I searched through the parts manuals, studying the UOC (usable-on code) numbers for items which were used on the shelter carrier but not on the basic cargo truck. Then I knew what parts to look for. You may need to do a similar task, looking for the suspension part numbers that are different between the base model of your truck and the up-armored configuration. Those all might be different from what my truck needed, as my truck was a 1986 model, and you might have a gotten newer version of the truck through your supply channel than is available to non-governmental collectors. Regular collectors mostly have early models from the late 1980s, and very few trucks from the early 1990s, all of which were sold in a pair of auctions around 1999/2000, while I think that police forces might have access to newer vehicles that were surplussed later on.
Just changing the springs won’t work if your truck is like mine. I also had to change the rear spring seats, shock absorbers, and the lower rear control arms, to accommodate the longer heavy-duty springs.
Hi, you might want to upgrade the front suspension also because down hill or heavy braking the front suspension will have lots of weight being transferred forward ……like they say, 80 percent of the vehicle braking is on the front wheels…..and “Armored up” is extra weight all over the vehicle……just my 2 cents worth……john
Thanks for the reply and the info. we do have one your year model and from what I’ve checked so far, the parts you changed for the rear is what we have to change as well, I have just had a hard time finding if the same parts are needed for the front. I will keep looking. thanks for your help.
Michael Kane
I work at equipment consolidation site on an military instalation. we turn in allot of HMMWV’s to DRMO on post where they in turn put it on there website. You can start bidding on military vehicles 5tons, M915 line haul, m916’s and a whole lot of different things. Not sure about HMMWV but they can tell you where to look They even have rollers, dump trucks, rollers, forklifts, trailers of diferent kinds, etc ect ect….. Its for all equipment for all sites in the US. You have to register first of course, but the email for the site is government liquidation
We sell HMMWV’s in our online marketplace GovPlanet.com. We recently took over the rolling stock contract for the DLA and we have about 4000 M998’s that will be up for sale every Wednesday. We are selling these items in all 50 states. You can pick one up for $8-$10k. All different configurations. Check us out!
It’s interesting to see intact HMMWVs being sold again. However, the listings I looked at (admittedly, just a couple listings in California) indicate that the trucks are being sold for off-road use only. In my opinion, they’re pretty much just parts trucks if they cannot be titled and registered. If I’m mistaken about the possibility of legally using any of these trucks on-road, then I’d like to know about that.
Is GovPlanet.com affiliated with Government Liquidation?
No we are not affiliated with Government Liquidations. They had the contract for many years and we (IronPlanet) took over in the last quarter of 2014. IronPlanet gives 75% of the profits from each vehicle sold, back to the government. Gov Liquidations was only giving back a fraction of that from their sales because of low auction numbers and the way their contract was written. We hand the government a check for over a million dollars each week. You are correct about the title. The government is not offering titles for the HMMWVS at this time so they are for off road use only. Some of these units have seen very little use and some are in rough shape. I am the territory manager for Southern California and have about 350 currently for sale at my locations. Let me know if you ever have any questions
Thanks for replying! I can’t say that I’m sad to see that GL has lost the contract. I’ve been out of the loop on military vehicle stuff lately, as I’ve been focusing more on my other hobbies, or else I probably would have known about that.
Well, it’s disappointing that the government isn’t offering title documents on these trucks, but I suppose it’s still a big improvement over just smashing them!
You can get it titled for on road use; but it depends on which state you are in. First you need a SF-90 form which Gov Planet will provide along with bill of sale. I live in Indiana. First have to have a Law Enforcement officer come out and fill out the state form and sign it, then send that form in to request a VIN# . Once you get the VIN#, then you can apply for Title. Takes a few months, but then you have a street legal vehilce.
Hi John
Can you please give me some advice, I have listed on your site and are very interested in a Humvee to export to me here in New Zealand, I have spent hours trying to check out the Demil “Q” situation, is there any way at all I can get one of these exported, It seems simple for you guys to purchase one, what about if I purchased one after it had a US owner, would that help ?
Thanks
Philip
I’d take a Rover over a Hmmmv….john
Hi,
Great write up on your humvee. You put a lot of work into that baby!
Just curious.. how many miles were on it when you bought it? I’m thinking of picking up one of these humvees off IronPlanet’s auction site, some have very low miles (5,000 miles or less). Was hoping the lower miles would mean less work to do.. thoughts?
Also, what does your oil pressure gauge show at idle and when running?
thanks!
Chris,
About 90% of the HMMWVs we inspect read around 30 at low idle.
Hi. I don’t remember how many miles were on it when I bought it, but it really doesn’t matter. Individual truck condition is much more important than what the odometer says. There’s not even any guarantee that the speedometer is original to the truck, as it’s an easily-replaced part.
I can’t say what my oil pressure gauge reads, since my truck has been buried in my barn without being started for around 5 years. :(
If you’re thinking of buying one of the IronPlanet trucks, be aware that they are being sold without titling documents, which means that you will not be able to legally register them for on-road use.
Here in Southern California we are speaking with a company that retrofits the HMMWVs to make them street legal. I’m thinking that in the near future you will be able to get a salvage title and make the necessary changes to get them on the road. I talked to another guy who bought a few units from my location and he told me he could get them registered with historical plates as long as they were the M998 model manufactured before 1990. This was in Arizona.
Awesome! I hope that will work out. Having lived through the “fun” of dealing with titling of HMMWVs after the original batch was surplussed out in late 1999, I sure hope that you can make these new sales go smoothly and get more of these vintage trucks legally on the road.
Mark,
Interesting read, you really had some hoops to go thru, I am a Marine, but have been out since 1980, just bought a M998 from GovPlanet, and seems to be a good unit, doesn’t seem to have near the issues you have battled. Mine is an 89 has the high cargo area frames and cover in great shape for age. I have the title coming to me via GovPlanet. Once received I plan on get it registered here in Texas, only have an issue with the blinkers so far, and the odometer doesn’t function, but should pass an inspection, my plan is to go to DMV when all paperwork is in order, such as the title, inspection, insurance and GovPlanet paperwork. Are there any other items or paperwork that I should consider before taking off to the DMV?
Hi! My experience with registering my HMMWV is almost 20 years old, and only applicable to California. It is my understanding that all of the HMMWVs being sold by GovPlanet come with off-road-use-only restrictions on their title paperwork. That was not the case when I bought mine.
Could you get the name of the company in Arizona? Any recommendations reference getting a salvage title or any possible avenue for getting a title would be greatly appreciated.
2008 M998
6.5L
Slantback
Hi Julian, Did you get title? I just aquired a M998 and found a “MVD authorized” inspector who helped my get title and registration. Email me tim@wolfgangscooling.com if you want his info.
Thanks for the insight, guys. There is one HMMWV up for auction that looks lightly worn but is showing 65-ish on the oil pressure gauge. Maybe it had just been started and they run high until they warm up? Or is this a warning sign??
John, please keep us updated on the possibility of getting them street legal. That should definitely help sales.
Mark, I hope you find time to dust yours off and take it for a spin. Looks like a blast.
As said odometer means little — for example most IRON planet vehicles show low mileage but are often rolled over 100K miles on the odometer.
Enjoyed your discussion on Conversion to M1037 Shelter Carrier. I just bought a S250/G shelter from Tobyhanna, PA. Found the HMMWV Mounting Kit: NSN 2590-01-350-4482 P/N 57K1639 Technical manual figure 283 at http://www.liberatedmanuals.com/TM-9-2320-280-24P-1.pdf.
WHERE did you get your mounting frame? Do you recall what you paid for it?
I’ve spent about 4 hours looking and sending in RFQs to companies that deal in parts.
I got the mounting frame from another collector who I’ve long since lost touch with. I don’t remember how much I paid for it; it was probably a “shut up and take my money!” moment. I wouldn’t have a clue where to find another one, and I’m still amazed I ever found the one that I have! I sure hope that you can find one. I think that properly configured HMMWV radio shelter carriers are probably one of the rarest configurations in the hands of collectors, since that’s such an esoteric configuration.
I have an idea for you to make some money. Since you have a mount as a model, consider making a design plan package showing shapes and hole drilling information so others can have a welder make one from angle iron or aluminium. Then list it on EBay and send out paper or electronic design information. Just a thought.
Mike
Hi Mark,
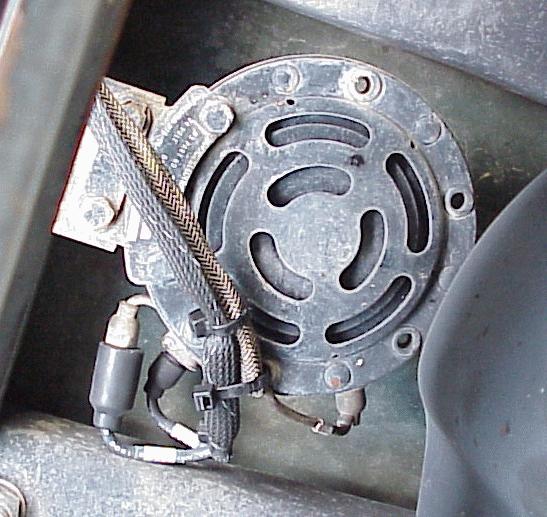
Had the HMMWV down at Hollister Hills again last weekend, had a great time camping and doing their 40th anniversary event. I’m getting pissed at my Kysor fan solenoid. It has a verrrrry slow leak that wets the deck that I can’t seem to seal. I don’t think it’s worth changing the valve because they’re bloody expensive and wondered if you had any ideas about them. If I read the hydraulic schematic correctly it looks like a simple 3 way valve. The power steering pump output is always being sent to the steering box and then when the solenoid actuates it taps off a little pressure to actuate the clutch. Why wouldn’t any solenoid valve that’ll handle 850psi work?
Kurt
That hydraulic valve is one of the few things I haven’t had trouble with on my HMMWV yet, so I haven’t studied it very carefully. I did install a quick-disconnect in the line to the fan clutch to make service a bit easier, based on an MWO that I found. And I had to rebuild my power steering pump, which just cost me $17 for a seal kit… probably the cheapest single thing I fixed on my truck!
I don’t see why some different 24V solenoid valve couldn’t be substituted. I’m not aware of anything unusual about its requirements. It’s just operating a fan clutch, so it shouldn’t even need to handle high flow rate or anything like that.
Hi,
How did you modify the wheel lock to fit on the HMMWV? I’d like to eventually do the same for mine as I don’t want to compromise the originality with a keyed ignition, messing the wiring for a cutoff, etc. but I also want to secure it when I’m out and about (plus, seems like a wheel lock would protect against an emergency brake failure-induced rollaway).
Thanks
I cut off the tips of the jaws to make their opening wide enough to fit around the big HMMWV tires. If I remember correctly, the jaws are aluminum cast around rebar, and the rebar poked out from the tips of the jaws. I cut off the protruding tips, which made the jaw opening just wide enough.
Mark,
I know this sounds like a broken record any idea on what it’s like to get a HMMWV road legal in California? Gov. Planet states FOR OFF USE ROAD ONLY yet I’ve seen a couple of M998 on the road. I have been toying with the idea of getting a M998, but with the on road restriction whats the point.
Dave
I have not had any involvement with titling or registration of HMMWVs since I bought my own 16 years ago. That being said, to the best of my understanding, any civilian-owned HMMWVs that are legally on the road were released from the government without “for off road use only” restrictions on the certificate to obtain title. For example, the 700 or so of them that were sold in dealer-only auctions around 1999-2000. It is my understanding that a buyer of a “for off road use only” HMMWV will not be able to register their truck for use on public roads.
Mark,
Well that’s kind of what I’ve been reading it’s to bad too this will probably drive up the prices of the HMMWV’s that are one the road now. So I’m guessing the on road legal ones (like yours) are able to be re-registered each year without any issues?
Dave
That is correct. I have not had any trouble. The “off road use only” thing comes into play when obtaining the first civilian title for the vehicle.
Mark,
Tried to check into your military AM net on 75m last night, but was having technical difficulties in the shack. Most stations were strong at my QTH and your 25 watts was doing okay a little light at times though, hopefully sometime soon I can check in.
Thanks for trying, and better luck next week! I hope I’ll find time to work on my big T-368C transmitter soon, so I can go QRO again. 73 de NF6X
I need help with Ingnition lever wire installation. I need to know what slot the 11a,14a and 23A go into Like the S, R,
Hi. I know you work on a lot of M998 Was wondering if you ever ran across problem with no low beam on drivers side only? I see this to be a common problem but no answers on what the cause or repair is? Can you help please? Is there a headlight control module?
If your are getting current to the dimmer foot switch it should be no problem tracing down the wires going to the seal beam…..also check the grown return as i would suspect that first……also swap left with right light to insure that is is not a faulty light…..do the swap first…..best of luck…..john
Thank you.. I checked the ground replaced the headlight and bucket. Will trace back from bucket to high beam floor switch next. Its very frustrating to me im not good with electrical stuff.
need help why r there fuel line go to wheel hubs, obviously it for cooling but no retun line help out
Those are air vents. Gear boxes need vents so that they don’t blow out their seals when they get hot. On HMMWVs set up with the deep water fording kit, all of the vents are plumbed to a vent tube on the side of the air intake snorkel, if I remember right. There’s also a valve near the driver’s knee that has something to do with the fording kit, but I was never clear on just what it does. My truck has the fording kit, but I wouldn’t think of actually fording my old truck unless I went and replaced every single seal!