This post is part of a series of posts describing practical use of the M-209 cipher machine. The series will cover operation of the machine, setting the cipher key, formatting of messages, ciphering and deciphering messages, dealing with transmission errors, practices to make cryptanalysis (code breaking) of messages more difficult, and generating new key tables.
This chapter covers basic operation of the M-209.
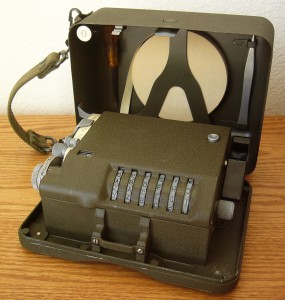
The M-209 Cipher Machine
The M-209 is a cipher machine designed by Boris Hagelin, and used by U.S. forces during World War 2 for encryption of lower level traffic. It was known to be breakable by German forces, but it was still useful for low-level, high-volume traffic that only needed to be protected for a matter of hours. More details about the machine’s functioning and history can be found online at many places including Wikipedia and my own web page. M-209 machines are available on the surplus market, but they are somewhat rare and expensive (despite being among the least expensive cipher machines available). If you do not have access to a real one, you can use a simulator such as this excellent graphical simulator for Windows computers or the command-line simulator I wrote to help me understand the machine better.
Chapter 1: Cryptographic Basics
Chapter 2: Operating the M-209 (this post)
Chapter 3: M-209 Under the Covers
Chapter 4: Enciphering Messages
Chapter 5: Deciphering Messages
Chapter 6: When Things Go Wrong (coming soon)
Chapter 7: Making Things Harder for the Enemy (coming soon)
Chapter 8: Creating Key Tables (coming soon)
Chapter 2: Operating the M-209
This chapter covers basic operation of the M-209 cipher machine. For now, we’ll assume that the internal key settings of the machine have already been set up, maybe by a helpful cipher clerk. One of the advantages of the M-209 is that once the internal settings are made (which are admittedly a bit tricky to do correctly), the basic operation of the machine is very easy. We’ll also assume that the machine is already loaded up with paper and a fresh ink roller. Finally, we’ll overlook a lot of details that a cipher clerk will need to know to use the machine effectively for now. We’ll start with the basic operation, and move on to other details in later chapters of the series.
The M-209 has an outer cover (lid) that you will need to open to see the controls. Just push the button on the front to release the latch, and hinge the cover open. Swing the spring-loaded cover support (E in the figure below) around and hook it onto the little lug inside the outer lid. You can place the M-209 on a table, or rest it on your knee. The curved bottom surface is intended to let the machine sit comfortably on your knee, and the two lugs on the bottom of the case let you attach the long strap from the machine’s carrying case and then hook the strap under your foot to hold the machine in place on your knee, like this:
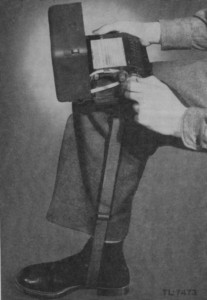
M-209 on Operator’s Knee
Now that you have the outer cover open, take a look at the various controls:
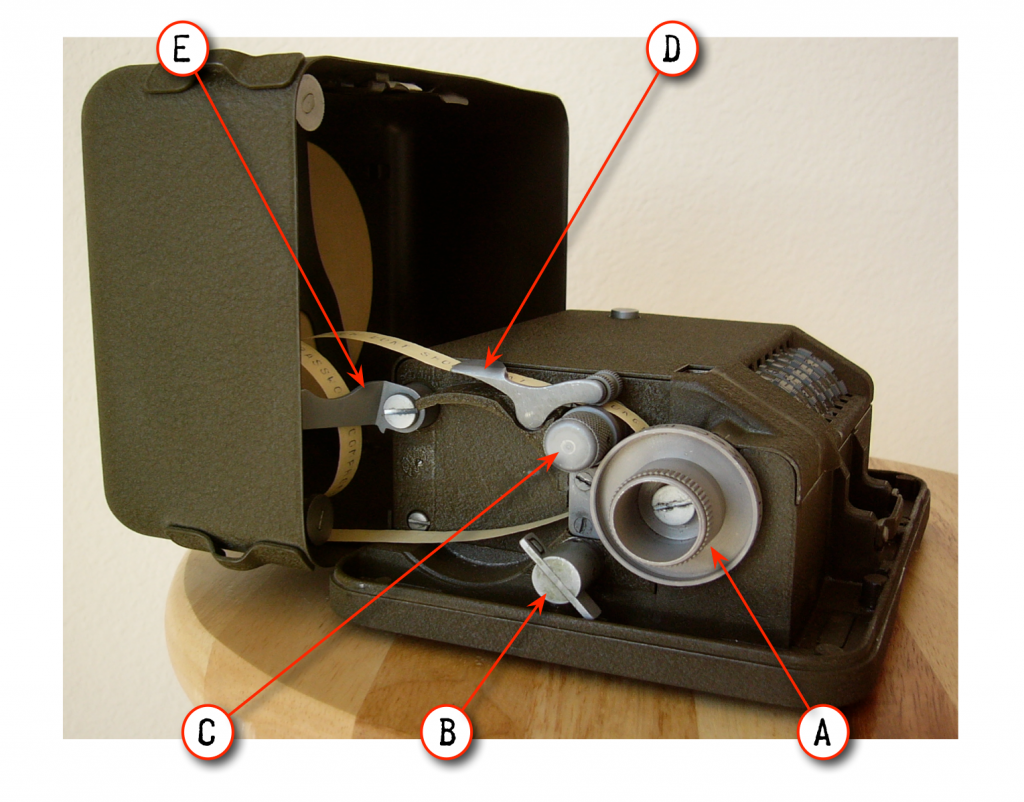
M-209 External Controls, Left Side
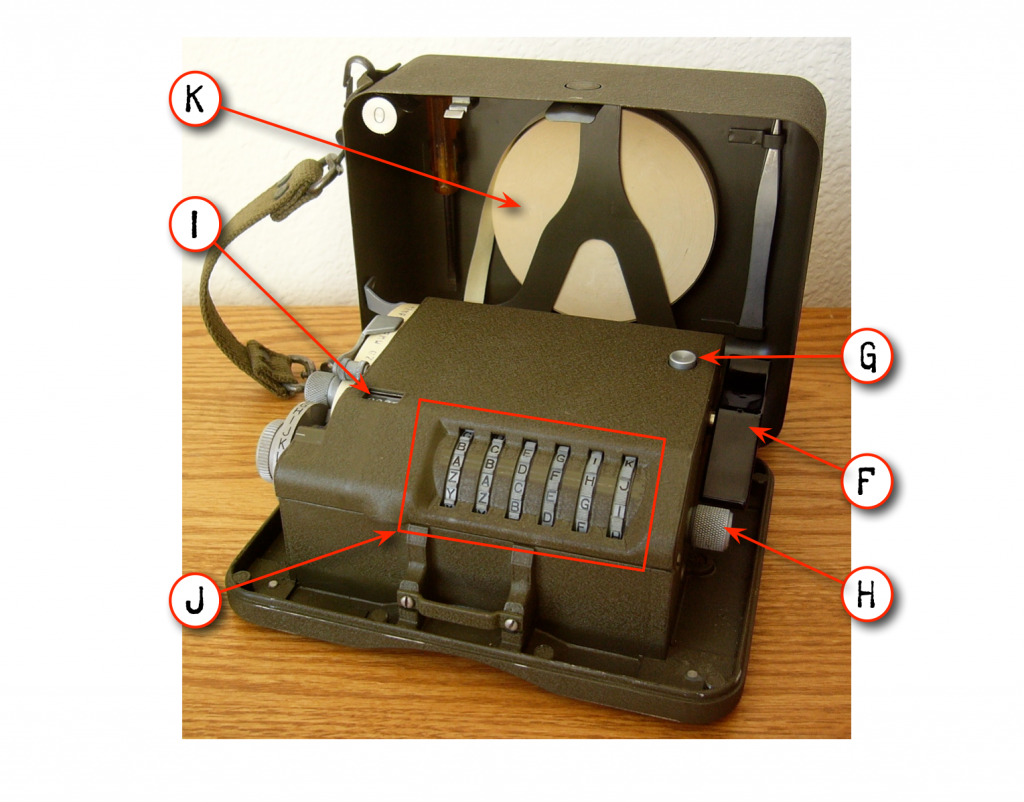
M-209 External Controls, Top and Right Side
(A) is called the Setting Knob. You dial in each letter of the plaintext or ciphertext message with this knob.
(B) is the Encipher-Decipher Knob. You set it to C to encipher messages, or D to decipher them.
(C) is the Paper Feed Knob. You can turn it to feed paper tape through the printing mechanism, and you press lever (D) to release the paper feed when you load new paper tape into the machine. A reel of paper tape is installed inside the outer cover at (K). You can tear off the paper strip against the sharp rear edge of lever (D). Keep the end of the paper tape under lever (D) so you can do that.
(E) is the Cover Support, which holds the outer lid in place while you use the machine.
(F) is the Drive Knob. You turn this knob 180 degrees to encipher or decipher a letter and print the result on the paper tape. Each time you turn the drive knob, it locks in place until the setting knob is turned again. This helps to keep the operator from accidentally enciphering/deciphering the same letter twice or partially cycling the machine. The setting knob is also locked while operating the drive knob. This enforces a rhythm of repeatedly dialing in a letter on the setting knob and then turning the drive knob 180 degrees to operate one full cycle of the machine.
(I) is the Letter Counter, which indicates how many letters have been enciphered/deciphered in the current message. The operator uses this counter both to record the length of a message when sending it, and to keep track of his progress in the middle of a message in case he gets lost. You should reset it to 0000 at the beginning of each message by holding down Reset Button (G) while turning Reset Knob (H). You can turn the reset knob in either direction to advance or rewind the letter counter and the Key Wheels (J), for example if you need to retry deciphering a portion of a message.
Now, let’s take a closer look at the setting knob (A):
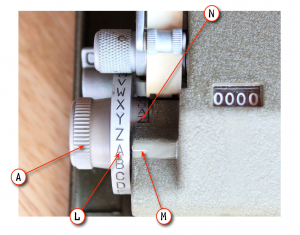
M-209 Setting Knob Details
(L) is called the Indicating Disk. It’s simply a ring with the letters of the alphabet on it. To enter a letter of plaintext or ciphertext into the machine, you turn setting knob (A) until the desired letter on indicating disk (L) lines up with the painted line (M) on the inner cover.
(N) is called the Reproducing Disk. It’s another ring of letters which indicates which letter was printed on the paper tape by the last operation of the drive knob. It’s there so that if you run out of ink or paper tape, you can still use the machine by manually reading off each enciphered or deciphered letter.
As explained in the previous chapter, the machine’s cipher key consists of two parts:
- The internal settings of the pins and lugs inside the machine, based on a key table, and usually changed daily.
- The settings of the key wheels (J), which are changed for each message sent.
In this chapter, we’ll assume that the internal settings have already been made, and we’ll use key wheel settings of AAAAAA to keep things simple.
For this example, I’ll assume that the machine or simulator has already been set up with this key table:
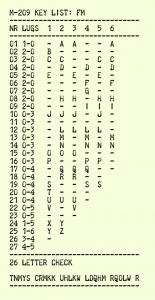
M-209 Key Table FM
If your M-209 machine or simulator is set up differently, then you will get different ciphertext results than are shown here. You can still follow along and try this stuff as long as your machine or simulator is set up with any valid key (i.e., the key has not been cleared out), but you’ll need to substitute your own ciphertext when we get to the deciphering stage. If your machine or simulator has been cleared, then you might just need to use your imagination until I show you how to set up the internal settings in the next chapter.
Enciphering the Message
Ok, let’s say that we want to encipher this message:
ATTACK AT DAWN
We’ll start by resetting the letter counter to 0000. Hold down the reset button (G) while turning the reset knob (H) forwards or backwards until the letter counter (I) reads 0000, and then release the reset button. Wiggle the reset knob as necessary until it clicks into place and locks.
Next, set the key wheels (J) to AAAAAA. Note that they only turn in one direction.
Next, set the encipher/decipher knob (B) to C. This mode selects the following behaviors:
- The machine automatically prints out the ciphertext in five-letter groups with spaces between them. This is a common way to format ciphertext, because it makes it easier to send the message or enter it into a cipher machine without getting lost.
- The operator can enter spaces in the plaintext by dialing in letter “Z” for each space. When we later decipher the message, those “Z”s will be printed out as spaces.
You might also wish to advance the paper tape a bit by turning knob (C) and then tear off any portion of the tape that has already been printed on. Just advance any printed letters past the rear edge of lever (D) and then tear off the tape against the rear edge of that lever. You should keep the tape underneath lever (D) so that you can use its sharp edge to tear the tape neatly.
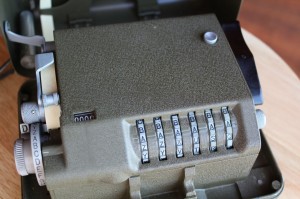
Here’s what the machine should look like now (click the pictures to see larger versions if needed):
Ready to Encipher the First Letter
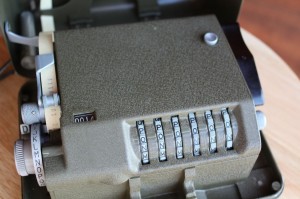
Now that we have the machine set up, we can begin enciphering the message. Turn the setting knob (A) until the first letter of the message “A” on the indicating disk (L) lines up with the painted line (M), then turn the drive knob (F) 180 degrees until it stops. Now, the machine should look like this:
First Letter Enciphered
A bunch of stuff happened when we turned the drive knob:
- Setting knob (A) rotated by itself, until letter “G” is shown on the indicating disk (L) and “T” is shown on reproducing disk (N).
- Letter “T” was printed on the paper tape, but it’s not visible yet unless you manually advance the tape.
- Letter counter (I) advanced to 0001.
- Key wheels (J) advanced to BBBBBB.
- Drive knob (F) locked, and it will remain locked until setting knob (A) is turned again.
Now, we continue dialing in the rest of the plaintext message and operating the drive knob after each letter. We dial in “Z” for each space in the plaintext message. Notice how each time we operate the drive knob, the setting knob turns a different number of clicks; this is the machine doing its magic and selecting a different ciphertext alphabet for each letter of the message, as described in the previous chapter.
Recall that the drive knob locks after each letter until the setting knob is turned again. What if the setting knob happens to land on the very letter that we want to dial in next? When that happens, you need to click the setting knob back and forth to unlock the drive knob. This won’t happen for this particular message and key table, but it does happen eventually in normal use of the machine.
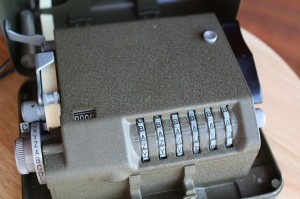
Ok, once we’ve dialed in the entire plaintext message, the machine should look like this:
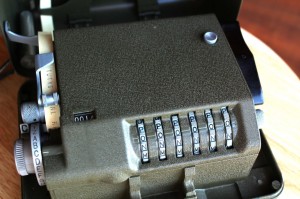
Entire Message Enciphered
The letter counter shows 0014, the total number of letters and spaces in the message. The ciphertext message is printed out in five-letter groups on the paper tape, and we can read it once we advance the tape with knob (C) and tear it off against the sharp edge of lever (D):
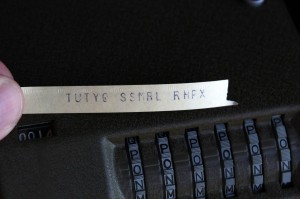
Message Ciphertext
Our message has now been enciphered as this ciphertext:
TUTYQ SSMRL RHPX
Deciphering the Message
We use almost the same procedure to decipher a message as the one we used to encipher it. Let’s start by resetting the letter counter back to 0000 by turning reset knob (H) while holding down reset button (G). This will also rewind the key wheels (J) back to AAAAAA, since that is what we set them to last time. If the message had been enciphered with different key wheel settings, then we would need to properly set the key wheels now. However, our test message was enciphered with the key wheels set to AAAAAA, so we use the same key wheel settings to decipher it.
Next, set the encipher/decipher knob (B) to D for decipher mode. This selects the following behavior:
- Now the machine will not insert a space after every five printed letters like it did in encipher mode.
- Whenever the machine deciphers a letter as “Z”, it will print a space instead.
The machine should now look like this:
Ready to Decipher the First Letter
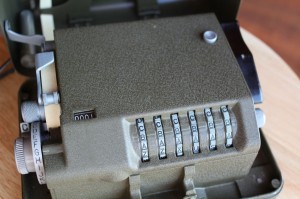
Now, we begin dialing in the ciphertext on setting knob (A) and turning drive knob (F), just like did when we enciphered the message. Don’t enter anything for the spaces between the five-letter groups, though; just ignore them, other than using them to help keep track of your place in the ciphertext as you work through it. Once we’re all done, the machine should look like this:
Entire Message Deciphered
Now we can advance the paper tape, tear it off, and see the original plaintext:

Message Plaintext
ATTACK AT DAWN
More Things to Try
If you have made it this far, here are some more things to try:
- Encipher the message with different initial key wheel settings. Notice that you get different ciphertext for each initial key wheel setting.
- Encipher a message that includes words that have the letter “Z” in them, like “ZERO”, “ZULU” or “ZEBRA”. Notice that the “Z” turns into a space after you decipher the message. When you compose a message, you need to make sure that the recipient will be able to figure out where the missing “Z”s belong.
- What do we do if the message includes numbers or punctuation? We can spell out the numbers or punctuation in that case, like “THREE”, “PERIOD”, etc. There are all sorts of ways you might abbreviate things, but the sender and recipient need to agree on how to do that to avoid confusion. During WW2, we changed our methods of indicating numbers and so forth every now and then to make things harder for the enemy to figure out. Some of the methods of attacking M-209 ciphers involve guessing probable words in the message, so changing common abbreviations occasionally complicates things for the enemy.
- Experiment with the reset knob some more. Start with the key wheels set at AAAAAA, then use the reset knob to advance the wheels. At first, they all advance to the same letters, such as BBBBBB, CCCCCC, etc. However, each wheel has a different number of letters on it, so after a little while the wheels get out of sync. Notice how they advance from QQQQQQ to RRRRRA, SSSSSB, TTTTAC, etc. This is where the number 101,505,850 came from in the previous chapter. If you started at AAAAAA, you would need to advance the wheels through 101,505,850 steps before they would roll over back to AAAAAA. I don’t recommend actually dialing the knob through over a hundred million steps, but it doesn’t take too many turns to see how the wheels get thoroughly jumbled after many cycles.
In the next chapter, we’ll open up the inner cover and learn how to load a key table into the internal settings of the machine.