This post is part of a series of posts describing practical use of the M-209 cipher machine. The series will cover operation of the machine, setting the cipher key, formatting of messages, ciphering and deciphering messages, dealing with transmission errors, practices to make cryptanalysis (code breaking) of messages more difficult, and generating new key tables.
This chapter covers composition, encipherment and formatting of messages.
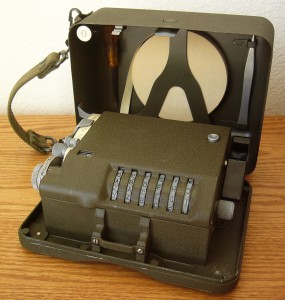
The M-209 Cipher Machine
The M-209 is a cipher machine designed by Boris Hagelin, and used by U.S. forces during World War 2 for encryption of lower level traffic. It was known to be breakable by German forces, but it was still useful for low-level, high-volume traffic that only needed to be protected for a matter of hours. More details about the machine’s functioning and history can be found online at many places including Wikipedia and my own web page. M-209 machines are available on the surplus market, but they are somewhat rare and expensive (despite being among the least expensive cipher machines available). If you do not have access to a real one, you can use a simulator such as this excellent graphical simulator for Windows computers or the command-line simulator I wrote to help me understand the machine better.
Chapter 1: Cryptographic Basics
Chapter 2: Operating the M-209
Chapter 3: M-209 Under the Covers
Chapter 4: Enciphering Messages (this post)
Chapter 5: Deciphering Messages
Chapter 6: When Things Go Wrong (coming soon)
Chapter 7: Making Things Harder for the Enemy (coming soon)
Chapter 8: Creating Key Tables (coming soon)
Chapter 4: Enciphering Messages
We’ve covered basic operation of the M-209 in previous chapters, but there are some details we’ve skipped over which are important when enciphering real messages. In particular, the sender needs to select key wheel settings for each message to be sent, and communicate those settings to the recipient in a secure manner. This chapter will cover such details, and then the next chapter will cover similar details at the receiving end.
There are many possible ways to for a sender to let a recipient know which key wheel settings to use for each message, but we’ll just cover one specific method here. This method was described in the M-209 technical manuals and at least one WW2-era training film, and is also known to have been used in practice as indicated by German intercepts which showed the particular formatting described here.
Step 1: Make Note of the Key List Indicator
Each key table is identified by a two-letter code called the key list indicator. This code will be included in the enciphered message so that the recipient will know which key table to use. For this example, we will use the same key table we used in the last chapter, with key list indicator FM. Naturally, your M-209 needs to have its pins and lugs set as directed by this key table before proceeding.
Step 2: Select External Message Indicator
The first step in this somewhat complicated procedure is to select an arbitrary set of key wheel settings and write them down. This set of key wheel settings is called the external message indicator. We will not use these settings to encipher the message. Instead, we will use them to generate the real starting key wheel settings for the message, and we will include them in the enciphered message so that the recipient will be able to do the same thing.
There is one important thing to remember: Never use a particular external message indicator more than once with a single key table. If you do re-use an external message indicator, then that makes it much easier to break your ciphers.
For this example, we’ll use an external message indicator of ABCDEF. This one will be easy to recognize as it shows up in various places.
Step 3: Select System Indicator
Select a random letter and write it down. This letter is called the system indicator. For this example, we will use G.
Step 4: Generate Internal Message Indicator
The initial key wheel settings that we use to encipher the message are called the internal message indicator. Here is how we come up with them:
- Reset the letter counter to 0000, and set the encipher-decipher knob to C.
- Set the key wheels to the external message indicator (ABCDEF in this example).
- Encipher the system indicator letter (G in this example) twelve times, and tear off the resulting tape:
FPKFW MHUPL CD
- Reset the letter counter to 0000 again, then set the key wheels to the letters on the tape that you just tore off. Go from left to right, setting each key wheel with the next letter on the tape. If a printed letter is not present on the wheel that you are trying to set, then cross it out and try the next letter.
In this example, we set the first four wheels to F, P, K and F, respectively. Then we discover that W is not present on the fifth wheel, so we cross it out and try M. That works on wheel five, and H works on wheel six. We end up setting the key wheels to FPKFMH, so that is our internal message indicator.
If you run out of letters on the tape before you set all six key wheels, then go back to step 2 and try again with a different external message indicator and system indicator.
Step 5: Encipher the Message
Now we encipher the message, using the internal message indicator that we just came up with. Let’s encipher this message:
ATTACK AT DAWN
We reset the letter counter to 0000, set the encipher-decipher knob to C, and dial in the internal message indicator of FPKFMH. Then, we encipher the message to get:
NQHNL CAARZ OLTV
Step 6: Put it All Together
We now take our enciphered message from the previous step, and dress it up by adding message indicators at both ends. The message indicators are composed of, in order:
- The system indicator letter that we picked, written down twice. Now we can see why it was called the “system indicator” instead of “that random letter” or something similar: Besides telling the receiving operator which letter to encipher when extracting the internal message indicator, the presence of a repeated letter at specific places in a cipher message is one of the hints that indicates that the M-209 was used to encipher it.
- The external message indicator.
- The key list indicator.
We combine those three pieces together and split them up into five-letter groups, like so:
  GG     (system indicator letter, twice)
+ ABCDEF (external message indicator)
+ FM     (key list indicator)
-------------------------------------------
= GGABC DEFFM
Add the ciphertext after the message indicator, like so:
GGABC DEFFM NQHNL CAARZ OLTV
If the final group has less than five letters, then add on ‘X’s to make it a five-letter group:
GGABC DEFFM NQHNL CAARZ OLTVX
Now add a second copy of the message indicator to the end of the message:
GGABC DEFFM NQHNL CAARZ OLTVX GGABC DEFFM
Now we can see another hint that will tell the receiving operator that this is an M-209 message: Not only is the first letter repeated, but the last two groups are also the same as the first two groups.
Write out the finished message on a standard M-210 message form:
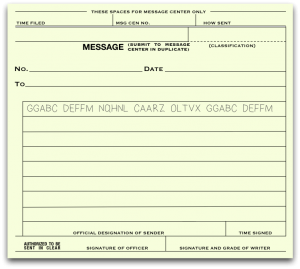
Cipher Message on M-210 Form
There are other fields to be filled out on the form before it can be sent, but we won’t cover those details right now. If you really want to learn about them, then watch this 1942 training film about message center procedures. After the form is fully filled out, it might look something like this:
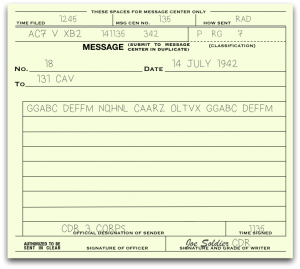
Completed M-210 Message Form
Step 7: Cleaning Up

Code Machine Operator Burns Classified Materials in Burma, Feb-Jun 1944.
Photo courtesy of Merrill’s Marauders Association. Used with permission.
Our message is complete, but we need to clean things up before we do anything else:
- Destroy all message tapes generated during this procedure. This includes the tape you made while generating the internal message indicators, and any other tapes that didn’t end up glued to the final message form. A busy message center might have burn bins to throw them into and staff members who periodically empty them and destroy their contents. If you don’t have such facilities, then just burn the tapes yourself.
- Scramble the key wheels so that the internal message indicator can’t be read from them.
These may seem like small details, but they’re important parts of maintaining security.
We’ve learned a lot already! In the next chapter, we’ll learn how to recognize and decipher an M-209 message. You might be able to guess everything you need to know from this chapter and the previous ones, but we’ll cover it anyway before we move on to trickier things.