This post is part of a series of posts describing practical use of the M-209 cipher machine. The series will cover operation of the machine, setting the cipher key, formatting of messages, ciphering and deciphering messages, dealing with transmission errors, practices to make cryptanalysis (code breaking) of messages more difficult, and generating new key tables.
This chapter covers internal key settings of the M-209.
The M-209 Cipher Machine
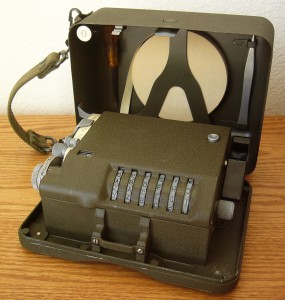
The M-209 is a cipher machine designed by Boris Hagelin, and used by U.S. forces during World War 2 for encryption of lower level traffic. It was known to be breakable by German forces, but it was still useful for low-level, high-volume traffic that only needed to be protected for a matter of hours. More details about the machine’s functioning and history can be found online at many places including Wikipedia and my own web page. M-209 machines are available on the surplus market, but they are somewhat rare and expensive (despite being among the least expensive cipher machines available). If you do not have access to a real one, you can use a simulator such as this excellent graphical simulator for Windows computers or the command-line simulator I wrote to help me understand the machine better.
Chapter 1: Cryptographic Basics
Chapter 2: Operating the M-209
Chapter 3: M-209 Under the Covers (this post)
Chapter 4: Enciphering Messages
Chapter 5: Deciphering Messages
Chapter 6: When Things Go Wrong (coming soon)
Chapter 7: Making Things Harder for the Enemy (coming soon)
Chapter 8: Creating Key Tables (coming soon)
Chapter 3: M-209 Under the Covers
We’ve covered cryptographic basics and basic operation of the M-209 cipher machine in previous chapters. Now, we’ll open up the inner cover and learn how to adjust the internal settings of the machine. As explained previously, the machine’s cipher key consists of two parts: The initial settings of the key wheels (changed for each message), and the internal settings of the machine (usually changed daily). The internal settings are made by changing the positions of a bunch of pins and sliding lugs inside of the machine. The M-209, like many other cipher machines designed by Boris Hagelin, belongs to a class of cipher machines which is commonly called “pin and lug” machines for this reason.
Begin by opening the outer cover and securing it with the spring-loaded cover support, as described in the last chapter. Now, lift up the front edge of the inner cover and hinge it open. There’s a little sheet metal spring tab protruding from the outer cover which pops over the edge of the window that exposes the letter counter, so that the inner cover will stay open. Once the inner cover is open, we can see the pins, lugs, and other internal parts of the machine:
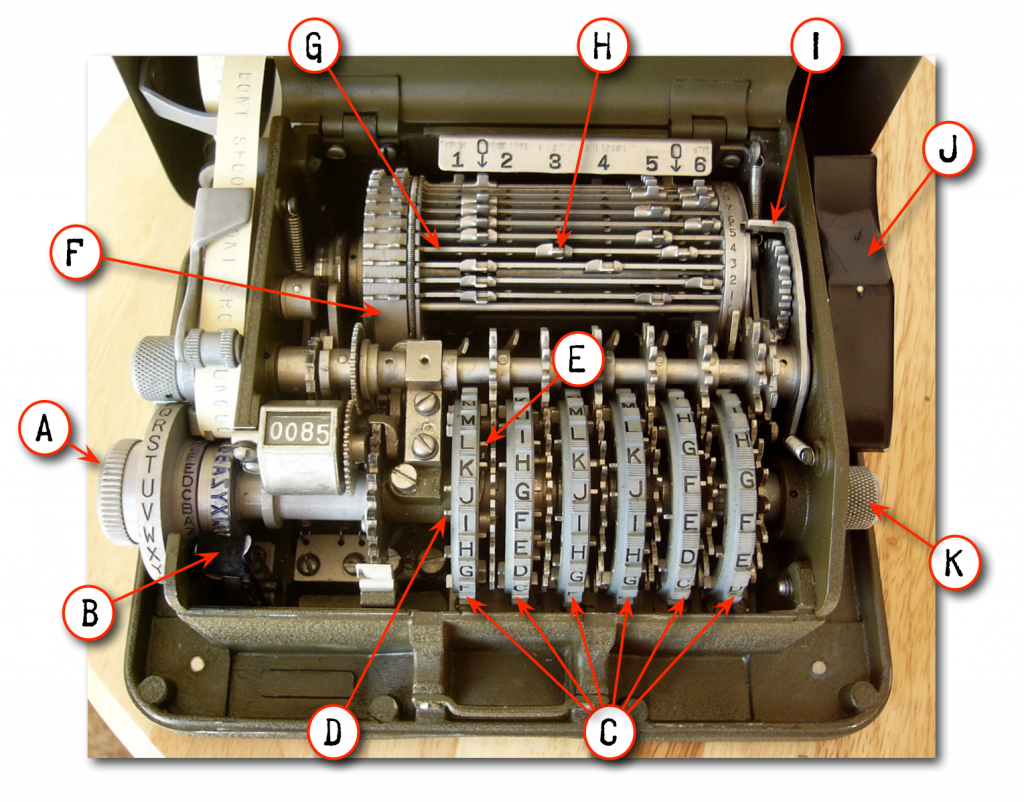
M-209 Pins and Lugs
Here’s what we find inside the machine:
(A) is the setting wheel that we learned about in the previous chapter. (B) is an ink roller that applies ink to the metal type attached to the setting knob. Replacing it can be a messy job, and there may be all sorts of inky debris inside the machine if it has been operated a lot since the last time it was cleaned.
The six key wheels (C) look a lot more interesting now that the inner cover is open. Each wheel has a rectangular sliding metal pin (D, E) underneath each letter. The pins may be slid either to the “ineffective” state (D) on the left side of the wheel, or the “effective” state (E) on the right side of the wheel. The six wheels have 26, 25, 23, 21, 19 or 17 pins and letters each, from left to right. Thus, there are a total of 131 pins to be set when we change the key each day.
Drum (F) has 27 bars (G) around its circumference. Each bar has two sliding lugs (H). Each lug may be repositioned by pulling it slightly back towards the front of the machine to unlock it, then sliding it to the desired position, then letting it spring back towards the rear of the machine to lock it in place. Lugs which are used in the key will be set into one of the six positions numbered 1 through 6 on the plate behind the drum. Lugs which aren’t used can be slid into either of the two positions marked 0 on that plate. The two “0” positions are functionally equivalent, except for one little detail: If a lug is placed in the left “0” position and other lug is placed at “1” or “2”, then one of the lugs won’t lock in place properly. The same goes for the right “0” position vs. the “5” and “6” positions. If the lugs get in each other’s way like this, just slide one of them over to the other “0” position, since they both work the same way.
When you push the reset button on top of the machine with the inner cover closed, that actuates reset lever (I). With the cover open, you’ll need to press down the lever itself while rotating reset knob (K).
You’ll turn drive knob (J) to rotate the drum to access all of the bars. Rather than turning it a full 180 degrees, you’ll gradually turn it to intermediate positions to get access to all of the lugs. Remember, after turning it until it locks, you’ll need to turn the setting knob (A) to unlock it again. Also, be aware that the reset lever and reset knob can’t be adjusted while the drive knob is in an in-between position.
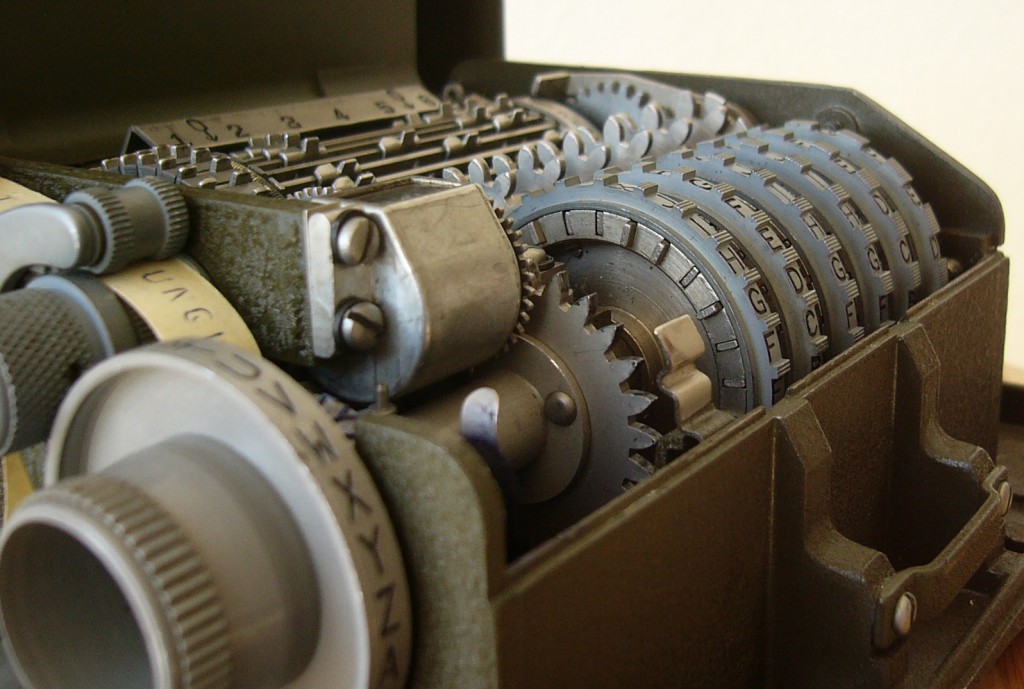
Here are pictures of the key wheels from a couple more angles to give you a better view of the pins:
M-209 Key Wheels and Pins, Left Side

M-209 Key Wheels and Pins, Right Side
The Key Table
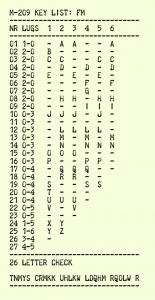
M-209 Key Table FM
So, you need to adjust the positions of 131 pins and 54 lugs to set the internal portion of the cipher key. How do you know how to set all of them? Well, that’s all described by a key table like the one at the right. Click the picture to see a larger version if the letters are too small to read.
Key tables (also called key lists) for the M-209 are customarily identified by two-letter labels called “key list indicators”, and in a later chapter we’ll see how to include the key list indicator in messages so that the recipient will know which cipher key to use. I gave this table the key list indicator “FM”, because I created it for use at an MRCG event at Fort MacArthur a few years ago. I’ve published a collection of ready-made M-209 key tables (including table FM) for you to use if you don’t want to create your own key tables.
Now lets’s look at the information in the key table. The first two columns, marked “NR” (meaning “number”) and “LUGS”, show how to set the 54 lugs at the rear of the machine. Each row’s number in the “NR” column identifies one of the 27 bars on the drum, as they’re numbered around the right side of the drum. Then the “LUGS” column contains two numbers which identify the lug settings for that bar. For example, on bar number 1 we would set one lug to the “1” position and the other lug to the “0” position. On bar number 27 we would set one lug to the “4” position and the other lug to the “5” position.
I like to arrange my tables so that the first number under “LUGS” in each row tells you where to set the left lug on that bar, and the second number tells you where to set the right lug. That’s not a guarantee for all tables, though. For example, the lug numbers for the first bar might have been specified as “0-1” instead of “1-0”, and you would have to figure out that you need to place the left lug on “1” and the right lug in the rightmost “0” position on the bar to keep the two lugs from interfering with each other, since the leftmost “0” position is too close to the “1” and “2” positions. In contrast, on the bars specified as “0-3” or “0-4”, it doesn’t matter which lug you place on “0” and which one you place on “3” or “4”, because neither of the “0” positions interfere with the “3” or “4” positions. Earlier versions of my simulator simply listed the lugs in numerical order, but I changed that based on user feedback that it was confusing for new users of the cipher machine.
The remaining six columns, marked “1” through “6”, each show the pin settings for the corresponding wheel, from left to right. Each letter shown indicates that the pin under that letter needs to be clicked over to the right to make it “effective”. If a dash is shown instead, that means that the pin in that position needs to be in the left or “ineffective” position. For example, on the rightmost wheel, we need to click pins A, C, D, F, H, I, M and N over to the right, and the remaining over to the left.
Finally, the end of the table shows a sequence of 26 letters divided up into 5-letter groups plus one leftover letter. This is called the “26-letter check”, and you’ll use it to make sure that you didn’t make any mistakes when you set the pins and lugs.
Clearing the Key
Before I explain how to enter a key as specified in a key table, I’m going to explain how to clear out any key that’s already set up inside the machine. A cipher clerk is supposed to clear the key out of his M-209 machine before letting them leave his control, to prevent compromise of the key. It’s easier to enter a new key starting from an initially cleared state until you gain experience with the machine, so I’ll start there.
There should normally be some tools clipped inside the outer cover of the machine. Over at the left side, there should be a small screwdriver with a notch cut in the tip of its blade. Don’t panic if it’s missing. Some or all of the tools are often missing from surplus M-209 machines. You can use any small flat-bladed screwdriver. Cutting a notch in the end makes it easier to set the lugs without the screwdriver slipping off of them, but an unmodified screwdriver will work, too. You just need to be a bit more careful with it if it doesn’t have the notch.
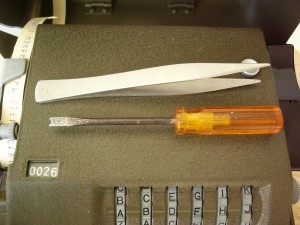
M-209 Screwdriver and Tweezers
There should normally be a pair of tweezers clipped under the lid, too. You use them to change the ink roller, and they can also come in handy for loading paper tape into the machine if your fingers are too big. They might be missing, too. Another couple of possibly-missing items that stow in the outer cover are an oil bottle marked “O”, and a bottle of spare ink rollers marked “I”. By now, the oil has probably leaked out (hopefully not all over the inside of your machine), and the ink rollers have probably dried out (hopefully they didn’t leak, either). Refill either bottle at your own risk, because the old leather seals may not work very well any more.
Ok, let’s start by setting the letter counter to “0000” using the reset lever (I) and reset knob (K). This isn’t entirely necessary, but it’ll come in handy later. Next, set all six key wheels (C) to “A”.
Now pick up the screwdriver (either the original one or a new one that you substituted), and begin sliding each pin (D, E) that you can see over to the left “ineffective” position. The wheels and gears will normally move a bit as you insert the screwdriver in between them, but don’t over-do it. Be gentle to avoid breaking anything. The pins should click into place without much force if your machine is in good condition.
You will only be able to reach a few rows of pins at first, so use the reset lever and reset knob to advance the wheels to expose some different pins. Reset those over to the left side with the screwdriver, too. Continue this process until all 131 of the pins are set to the left.
Next, set all 54 of the lugs (H) to the “0” positions. Here is where the notch in the end of the screwdriver comes in handy: The lugs click into locked positions under spring pressure, and you need to pull each one slightly towards you before you can slide it. Keep it pulled back while sliding it, then let it click into place under one of the “0” positions. Wiggle it a bit left and/or right until it clicks fully into the locked position. Again, be gentle… not much force is needed if the machine is in good condition.
You can clear the lugs on several bars easily, but then you need to rotate the drum to access the rest of the lugs. Rotate it by gradually turning the operating knob (J). Remember, if the knob is locked in place, then turn the setting wheel (A) to unlock it.
There! All of the pins are set to their ineffective positions, and all of the lugs are set to “0”. The key has been cleared from your machine.
Entering the Key
If you’ve cleared the key as described above, then you should be familiar with how to click the pins and lugs into place by now. You should also be able to restore all six wheels to position “A” by dialing the letter counter back to “0000” with the reset lever and reset knob.
Entering the new key is just like clearing out the old one, except that instead of setting each pin to the left and every lug to “0”, you set them to the positions shown in the key table. You can either set all of the pins followed by all of the lugs, or the other way around. Don’t set pins and lugs together for each line of the table, though, because that’ll be confusing, and it’ll be too easy to make mistakes.
Depending on personal preference you may wish to set the pins on each wheel as you read down that wheel’s column and click that wheel ahead, or you may prefer to set all six pins in each row of the table while you advance the wheels with the reset lever and reset knob. I prefer to do the latter, but your mileage may vary. Feel free to try it both ways and see which way works better for you. In either case, for each letter printed in the table, you click the corresponding pin over to the right side. For each dash, you click the corresponding pin over to the left side. If you cleared the old key as described above, then all of the pins should already be in their left positions, so you just need to click over the ones whose letters are printed in the key table.
Set the lugs one bar at a time. It makes no functional difference if you swap the settings of any two bars, but don’t do that anyway because that makes it harder to compare the machine’s settings to the key table when (not if!) you make a mistake entering a key. Set all of the lugs as shown in the table, and remember: Don’t try to set a lug right next to another lug in the “0” position, because they will interfere with each other and prevent one or both lugs from locking in place properly. If they aren’t locked in place then they will slide around when you operate the machine, and that will make it operate unreliably.
The 26-Letter Check
Once you’ve entered the key, it’s time to check your work to make sure you didn’t make any mistakes. It is easy to mess up entering a key even after you have done it many times, so that’s why each key table includes the 26-letter check to verify that the key was entered properly.
Go ahead and close the inner cover. Reset the letter counter to “0000”, then set all six key wheels to “A”. Set the machine to encipher mode by turning the knob on the left side to “C” position.
Now, encipher the letter “A” 26 times.
Advance the paper tape and tear it off, and then compare it to the 26-letter check in the key table. All 26 letters should match:
TNMYS CRMKK UHLKW LDQHM RQOLW R
If any of them does not match, then you made a mistake entering the key (or, much less likely, your machine is malfunctioning). Open up the inner cover, compare the pins and lugs to the key table. Make sure the lugs are all locked in place; look very closely, because it’s easy to overlook one that didn’t click into position. Make sure that all of the pins are clicked fully left or right. Keep on repeating this whole process until the 26-letter check passes with no errors.
Success?
If all went well and your machine passes the 26-letter check, then you have entered the internal cipher key and you’re ready for business. Try entering key table FM as shown above, set all six key wheels to “A”, and then see if you can decipher this test message:
RZZSB CYSZK BZXXE MESTS SDAPX
HAILG DHGOU FTQPR MQJLJ CBCAR
TPHVG LSTDJ FVYTP LJENS RYNEE
LUZHH IDUFN
In the next chapter, we’ll cover how to properly compose, encipher and format a message.